Step by Step guide to deploy Lync Server 2010 Edge Server


Lync Server Edge Server’s role is to provide access to the users who are connecting via the internet. Edge server usually deployed in DMZ (perimeter zone) of the network with dual NIC and having one leg (NIC) in external network while the other one in internal network.

below is a typical topology set up for an Edge Server.

Capture0

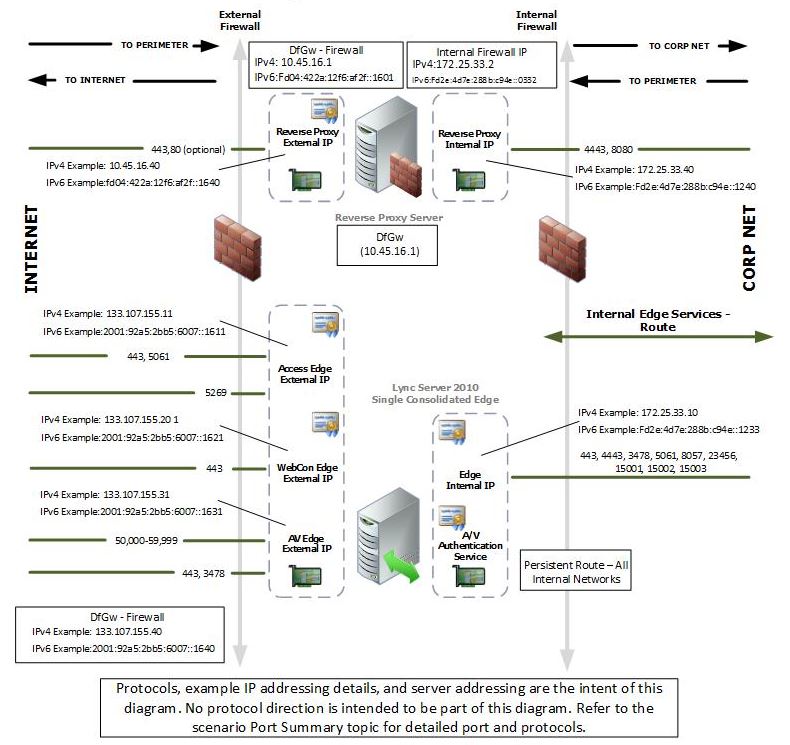
Internal interface for the Edge Server uses a certificate from Private CA while the External interface of the Edge Server use public Certificates. There are 3 services that run in Edge server which requires a Public Certificate. this will be coved later in the deployment process. let’s divide this guide in to two segments.

1. Infrastructure configuration to support Edge Server

2. Application Server deployment

Infrastructure configuration to support Edge Server

unlike the Front End server, Edge server doesn’t have much in internal infrastructure. there are several SRV records and A records that need to be created in the public domain for clients to discover the Lync Server and for the federation with partners.

  • sip.uctest.com
  • media.uctest.com
  • webcon.uctest.com
  • _sip._tls.ustest.com:443 resolve against sip.uctest.com
  • _sipfederationtls._tcp:5061 resolve against sip.uctest.com

_sip record is the record that assist clients to discover the domain and the Edge Server to connect to. if this record was not set, clients need to be configured manually to point to the correct Edge Server

_sipfederationtls record is configured to allow partners to discover Lync server platform and get connected via federation. This method is called open Federation. There are some organizations that doesn’t like this method. in that case, allowed domain and access edge server record need to be configured in Lync Server control panel to allow federation with that domain.

Unlike any other Lync Server application servers, Edge server is not recommended to join to Domain due to it’s security vulnerability. for this, the domain suffix will be configured as mentioned below

Capture6

Now to the second step

Application Server deployment

 Check http://technet.microsoft.com/en-us/library/gg398835.aspx to get an idea of the Hardware requirement for Edge Server. Check http://technet.microsoft.com/en-us/library/gg412883.aspx to understand the OS and additional software requirement.

prerequisites required to deploy lync Server 2010 Edge Server

  • Dot NET 3.5.1 features
  • Desktop Experience
  • Quality Windows Audio Video Experience

Now to configure the Lync Server topology with new server role. open the topology builder and save a copy of the topology as a backup

Capture10

 Navigate to the “Edge pools” and select to define a new Edge Pool

Capture11

This deployment is Single Edge server deployment. Select the Single computer pool and specify the server FQDN

Capture12

Select to enable Federation on port 5061 and leave the rest of the options as unchecked.

Capture13

Configure the public FQDN records for SIP, Web Conferencing and A/V. leave the default port configuration as it is.

Capture14

Configure the Internal IP address. this is the IP address that configured in the internal Interface

Capture15

Configure External IP addresses. these are the IP addresses that configured in the external interface. this can be natted IP addresses from Firewall.

Capture16

Select the next hop to the Edge server. in this scenario, it’s the Front End Server

Capture 17

Associate the Front End pool to the Edge Server

Capture18

Now, Publish the topology and jump in to the Front End server

Capture19

Since the Edge server is not joined to the domain, it cannot retrieve the Central Management Store automatically. Export the Configuration store from the Front End server as shown below.

export-csconfiguration “c:\config\config.zip”

Capture9

Copy the “config.zip” file from Front End server to the Edge Server. Run the Lync Server 2010 installation media and install the core components. run the deployment wizard and select to Add or Remove Lync Server Components

Capture20

Select to install the Local Configuration store. Specify the config.zip file to get the configuration information and complete the step

Capture21

Now, go to the next step to Configure Lync server components

Capture23

Complete the step. All checks looks green and ready to move ahead.

Capture24

Now to assign certificates. request the internal certificate first

Capture25

Since the server’s not join in to the Domain, the certificate request has to be done manually. select to prepare the request now, but send it later

Capture26

Specify a friendly name and Mark the certificate as Exportable. notice the SAN records. it’s normal that media.domain.com record doesn’t include as a SAN record.

Capture28

Select the SIP domain and save the request as a local file.

Capture32

Make sure to import the Internal Root CA’s self sign certificate in to the Trusted Root Certification Authorities container. else the communication between the Edge server and the Lync Server will fail.

Capture30

Request a WEB SERVER certificate from the internal CA based on the request file. Import the certificate in to Personal certificate container and go back in to Certificate configuration wizard. select to assign certificate and select the newly imported certificate. assign in to the internal interface

Capture33

Now go through the same steps for the External certificate. request this certificate from public certification Authority. Import the certificate in to personal certificate store and assign the certificate in to external interface

Capture36

Certificate assignment is completed.

Capture37

Now, start the services and check on Windows services whether all the Lync Server related services are started.

Capture39

Enable External user access from the lync Server control panel External Access policy.

Capture41

Now clients should be able to login from the internet.

Step by Step Guide to Deploy Microsoft lync Server 2010


Microsoft Lync Server 2010 came in to UC domain while ago and it’s here to stay. Lync Server platform is far better than it’s predecessor Office Communicator 2007\R2 which including interoperability with various IPPBX platforms and VOIP Gateways.

One of the great features that came up with Lync Server 2010 is the SBA (Survivable Branch Appliance) and SBS (Survivable Branch Server) which add the surviveability to small branch offices when the connectivity to the central server is offline. I will cover this component in different post.

and the licensing changes introduced with the new platform makes it more affordable for the SMB market and given the ability to compete with high end IPPBX s such as CISCO Call Manager and AVAYA Platforms.

This article describe how to deploy Microsoft lync Server 2010 from the scratch to a successful client log in. Let’s devide the whole deployment process in to 3 steps.

1. AD\Domain infrastructure preparation

2. Applications Server preparation

3. Deployment of Lync Server 2010 software

Let’s start with Step 1

AD\Domain infrastructure preparation

Before getting in to deployment, it’s impotent to check the health of all the domain controllers within the domain. It’s a must that Domain controllers replication are healthy and no errors in the process. If there’s any problem found, those problems need to be fixed before the deployment. Also the domain and forest functional levels of the domain controller should be at least Server 2003.

Another important part of this deployment is the Enterprise Root Certification Authority Server. This CA will provide certificates to Lync Server role services as all communication between server roles are encrypted.

check http://technet.microsoft.com/en-us/library/gg412986.aspx for detailed information regarding the infrastructure requirement.

when ready, create 4 new DNS A records as shown below against the IP address of the Lync Server Front End Server.

  • sip.uctest.com
  • dialin.uctest.com
  • meet.uctest.com

Capture1

Create a DNS SRV record as below to get clients to automatically discover the Lync Server

  • _sipinternaltls._tcp.uctest.com:5061

 Capture2

As a Best Practice, it’s always good to use a Service Account to deploy the application. In this scenario, i’ll use a user account called “SvcLync”. It’s a must that this user account has to be in Domain Admin, Schema Admin and Enterprise Admin security groups.

Now the infrastructure is ready for Lync Server. Let’s Prepare the Application server for Lync Server 2010 Standard Edition Front End Server

Application Server Preparation

 The Server OS that i used for this deployment is Windows Server 2008 R2 X64 with SP1. Keep in mind that Lync Server only support x64 Operating Systems only. It’s recommended the server to be patched to the latest patch that available along side with the Service Pack. You can find the detailed hardware requirement in http://technet.microsoft.com/en-us/library/gg398835.aspx.

If it’s a production set-up, it’s recommended to use the Lync Server 2010 Planning tool to plan the complete deployment. you can download the planning tool from http://www.microsoft.com/en-au/download/details.aspx?id=19711

Login to the server using the Service Account and install Prerequisites to the Front End server. Run the below command in Powershell as the Administrator.

Import-Module ServerManager

Add-WindowsFeature NET-Framework,RSAT-ADDS,Telnet-Client,Web-Server,Web-Static-Content,Web-Default-Doc,Web-Http-Errors,Web-Http-Redirect,Web-Asp-Net,Web-Net-Ext,Web-ISAPI-Ext,Web-ISAPI-Filter,Web-Http-Logging,Web-Log-Libraries,Web-Http-Tracing,Web-Windows-Auth,Web-Client-Auth,Web-Filtering,Web-Stat-Compression,Web-Mgmt-Console,Web-Scripting-Tools -Restart

Create a folder called “Share” and assign read and write permission for “Everyone”

capture4

Restart the server when prompted. After the server comes up again, Add the service account to the local administrators group in Front End Server. Now we are good to go with Lync Server deployment

Deployment of Lync Server 2010 Software

Now load the Lync Server media and run the installation file. Select to Install it prompted to install VC++.

Capture5

Open up the Deployment Wizard and let’s start with the Active Directory Preparation step. At this point, it’s very important to verify that the AD replication is healthy. Else some components of this step will fail

Capture6

select to prepare the Active Directory

Capture7

Schema Prep has completed Successfully.

Capture8

notice the Green check mark next to the Schema Preparation Step indicating that the step completed successfully

Capture10

Now Prepare the Forest. Select the Prepare Current Forest step

Capture11

At this point you need to specify what forest that need to be prepared. This step has to run for all the domains that available if those domains are used in Lync Server platform. in this scenario, I’m selecting local domain as there’s no other domain available in this set-up

Capture12

Proceed with the Preparation and finish the step.

Capture13

Both the Schema preparation and Forest Preparation are successfully completed. Give it some time replicate the attributes across the forest

Capture15

Now to prepare the Domain. Select the Domain preparation step

Capture16

Completion of this step is depending on the AD replication process. If all is well, this step will complete successfully

Capture17

The AD Preparation is successfully completed. All checks are green

Capture19

Now go back and install the Topology Builder. Unlike OCS, Topology builder is the centralized tool that used in Lync server deployment to specify server roles and FQDNS for the rest of the deployment.

Capture20

Now to deploy the 1st Standard Edition Server. This step is important as the 1st Standard Edition server keeps the Central Management Data store. there can be many Front End servers but the CMS will always be in 1st Standard Edition FE server

Capture21

Proceed with the installation and complete the step. All checks are green and good to go ahead

Capture24

Now, let’s go back to the Topology. Open up the topology builder and select to deploy a New Topology

Capture25

Save the topology and specify the primary SIP domain. This is the Primary SIP domain. there can be many additional SIP domain and can be added any time even after the deployment

Capture26

This is where to configure all the additional SIP Domains that are available. I’m leaving as blank as there’s no additional SIP domains to configure

Capture27

Now to define the Front End server pool.

Capture28

Define the FQDN of the Front End server and select to deploy the Standard Edition Server. Make sure that you get the above FQDN right. If you get this one wrong, you’ll be end up cleaning AD objects using ADSIEDIT.

Capture29

Now configure the services that goes in to the Front End Server. I’m selecting all services for this deployment

Capture30

No select what are the server roles that can be collocated in to same box. A\V conferencing server will get collocated by default in to Standard Edition FE server but it can be deployed i a separate box in Enterprise Edition. mediation Server can be scattered or collocated regardless of the Lync Server version

Capture31

Select what are the other server roles that are going to be deployed. I’m not going to deploy any other roles and leaving it black. Will cover deployment of these roles in up coming posts

Capture 32

Now define the File Share store. This is the share folder that I created while ago. this share folder will host Address Book files, UC Phone Updates and meeting contents.

Capture32

Configure the External Web Services URL. There have to be an A record created in Public DNS for this host name and This URL need to be published in TMG and reverse proxy in to Front End server.

Capture33

Complete the rest of the steps. go back to the Standard Edition server in the topology and edit properties. specify the CMS Server and the admin URL

Capture34

All looks good. now publish the topology

Capture36

Topology published successfully. now to install the services in Front End server. to do that, run the deployment wizard again and select “Add remove Lync Server Components”

Capture40

Step 1, Install the Local configuration Store. before getting in to this, the service account need to be added in to CSAdministrator and RTCUniversalServerAdmins security groups. if not, this step will be likely to fail. once ready, run the step. select to retrieve the CMS directly.

Capture41

Local Configuration Store deployment successfully completed. all checks green

Capture43

Now to Step 2. Setup or Remove Lync Server Components. Run the step and reboot the server when prompted.

Capture44

Run the step after rebooting the server. The step will complete successfully.

Capture45

Step is completed and checked green

Capture46

Step 3. request and install certificate. select the default certificate and request.

Capture47

Request the certificate immediately from the internal Root CA

Capture48

 Select the root CA and specify a friendly name for the certificate. select the certificate as Private key exportable

Capture50

Select the SIP domains that included in to this certificate. make sure that the check box for relevant domains are checked

Capture52

Once requested, assign the certificate in to Front End services. All good and green.

Capture54

Step 4. Start the services. Select to start the service and go in to Windows servers and verify that all the Lync Server services are started

Capture56

The deployment is completed. now to test a user login. enable a user for Lync Server

Capture57

Login to the client using the user credentials. Clint signed in successfully.

Capture58