Fixing PSTN Music On Hold In Lync When AudioCodes M800 In Use


I was recently informed by one of the clients that i deployed Lync Server 2013, is having issues when calls put on hold. There were 2 issue. The first and major is that, when a call put on hold and retrieved, there’s no audio from caller end. It’s basically one-way audio. And the other issue is that Lync MoH no longer works. Meaning that the caller hears nothing but dead silence.

Given that the PSTN integration was done using a SIP Trunk, i suspected that the provider must have done a change on the trunk which cause the feature to break and cause one-way audio when calls put on hold.

Digging in to the M800 Sys Logs, it seems that when a call put on hold by Lync client, the hold method that Lync use is “Inactive”. Below is the Re-INVITE sent from Lync to M800.

INVITE sip:SD4tl71-vv9pmjn1vl07h0t6in0808cjov84opsv-7@10.0.0.154:5067;transport=tls SIP/2.0
FROM: <sip:+61732680000@uctect.com.au;user=phone>;epid=D273FA8C4C;tag=575613f4b
TO: <sip:0451984283@lyngw01.ac-onebox.com;user=phone>;tag=1c1714098312
CSEQ: 433019 INVITE
CALL-ID: b01bc354-481a-4faa-aa5f-e4d14b46c1a7
MAX-FORWARDS: 70
VIA: SIP/2.0/TLS 10.0.0.151:60001;branch=z9hG4bKb6b1af81
CONTACT: <sip:UC-FE.ac-onebox.com:5067;transport=Tls;ms-opaque=9928a17d8863ebef>
CONTENT-LENGTH: 469
SUPPORTED: 100rel
USER-AGENT: RTCC/5.0.0.0 MediationServer
CONTENT-TYPE: application/sdp
v=0
o=- 34278 2 IN IP4 10.0.0.151
s=session
c=IN IP4 10.0.0.151
b=CT:1000
t=0 0
m=audio 51466 RTP/AVP 8 101
c=IN IP4 10.0.0.151
a=tcap:1 RTP/SAVP
a=pcfg:1 t=1
a=rtcp:51467
a=label:Audio
a=crypto:1 AES_CM_128_HMAC_SHA1_80 inline:Y8xM2t1C3q2zKVguMXQW3TPExRfQX8Dy6YPV+xVK|2^31|2:1
a=crypto:2 AES_CM_128_HMAC_SHA1_80 inline:35UmPksBksSuS3iCs+kjjTw2uruKKYS4ZRufvTYY|2^31
a=inactive
a=rtpmap:8 PCMA/8000
a=rtpmap:101 telephone-event/8000
a=fmtp:101 0-16

The “Remote Hold Format” parameter in IP Profile configuration for both Lync and PSTN profiles are set to “Transparent”. Which means that the SBC will not do any modification and it will send the SIP traffic as-is to the PSTN.

Capture1

As suspected, The M800 uses “inactive” method when call put on hold which pretty much grantee that there won’t be MoH.

SIP/2.0 200 OK
Via: SIP/2.0/UDP 172.0.0.158:5060;branch=z9hG4bKac1164951996
From: “Support” <sip:0892000000@ipsystems.com.au;user=phone>;tag=1c1718935812;epid=D273FA8C4C
To: <sip:0451980000@ipsystems.com.au;user=phone>;tag=SDu8t2799-1701991312-1456809140654
Call-ID: 1718912646132016131218@172.0.0.158
CSeq: 4 INVITE
Allow: ACK,BYE,CANCEL,INFO,INVITE,OPTIONS,PRACK,REFER,NOTIFY,UPDATE
Supported: timer
Accept: application/media_control+xml,application/sdp
Contact: <sip:SD4tl71-vv9pmjn1vl07h0t6in0808cjov84opsv-7@202.0.0.5:5060;transport=udp>
Content-Type: application/sdp
Content-Disposition: session;handling=required
Content-Length: 240
v=0
o=BroadWorks 34676300 2 IN IP4 202.0.0.5
s=-
c=IN IP4 0.0.0.0
t=0 0
m=audio 16496 RTP/AVP 8 101
a=rtpmap:8 PCMA/8000
a=rtpmap:101 telephone-event/8000
a=fmtp:101 0-15
a=inactive
a=maxptime:20
a=bsoft: 1 image udptl t38

To fix this, set of message manipulation rules can be configured and assigned against both Lync and SIP Trunk IP Groups. These manipulation rules will change the hold method from “inactive” to “sendrecv” before sending it to PSTN. And it will change the hold method to “inactive” instead of “sendrecv”, before sending it to Lync Mediation Server. There should be both inbound and outbound manipulation sets. Manipulation rules should looks like below;

Capture

The Manipulation Set ID 2 should be configured in to SIP Trunk IP Group Table “Outbound Message Manipulation Set” and Manipulation Set ID 1 should be configured in to both Lync and SIP Trunk  IP Group Tables “Inbound Message Manipulation Set”.

Capture4

Lync IP Group

Capture5

SIP Trunk IP Group

Upon configuring, run a test call and put it on hold. The caller was able to hear the MoH and audio was there when the call was retrieved. When looking at the Sys log of the call, the message manipulation was clearly doing what was expected.

SIP/2.0 200 OK
Via: SIP/2.0/UDP 172.0.0.158:5060;branch=z9hG4bKac25768176
From: “Support” <sip:0732684306@ipsystems.com.au;user=phone>;tag=1c1900081337;epid=D273FA8C4C
To: <sip:0451984283@ipsystems.com.au;user=phone>;tag=SDi988799-1512955841-1456808868261
Call-ID: 190005820313201613745@172.0.0.158
CSeq: 4 INVITE
Allow: ACK,BYE,CANCEL,INFO,INVITE,OPTIONS,PRACK,REFER,NOTIFY,UPDATE
Supported: timer
Accept: application/media_control+xml,application/sdp
Contact: <sip:SD4tl71-vv9pmjn1vl07h0t6in0808cjov84opsv-7@202.0.0.5:5060;transport=udp>
Content-Type: application/sdp
Content-Disposition: session;handling=required
Content-Length: 244
v=0
o=BroadWorks 34627140 1 IN IP4 202.0.0.5
s=-
c=IN IP4 202.0.0.5
t=0 0
m=audio 16670 RTP/AVP 8 101
a=rtpmap:8 PCMA/8000
a=rtpmap:101 telephone-event/8000
a=fmtp:101 0-15
a=sendrecv
a=ptime:20
a=bsoft: 1 image udptl t38

If you have a similar  issue with a SIP Trunk with MoH, this could most probably be the solution.

Integrate Lync Server 2013 with O365 Exchange for Unified Messaging


Lot of clients are now moving away from on premises Exchange and in to O365 these days. Exchange online came a long way and grown up a lot. In terms of Unified Communications, how should we get Voicemail out of O365 exchange?. And what will be the configuration that involves in?. To answer those questions, let’s have a look at what the prerequisites are and what the configuration should be.

Before moving forwards, there’s several critical points need to be addressed and understood;

  • On premises Lync Server 2013 deployment must have Edge servers installed and federation enabled
  • Edge server DNS resolution should be done via the External interface and not over the internal. It must have public DNS servers configured instead of internal DNS.
  • _sipfederationtls._tcp.domain.com SRV record must be configured in public DNS and resolve against the access edge FQDN (sip.domain.com)
  • The O365 Tennent domain must be set to “Authoritative” accepted domain

Form above mentioned 2 points, I cannot stress the importance of proper DNS configuration enough. If the DNS wasn’t properly configured, the whole partner federation component will get broken as a result and it will not be a pleasant experience.

To check if the domain is accepted and authoritative within O365, below command can be used

Get-AcceptedDomain  | Format-List

So, to begin with the configuration within Lync Server, verify the configuration of the Access Edge. It should be as mentioned below;Capture4

Next, a Hosting Provider needs to be configured. To configure this, run the command; New-CsHostingProvider -Identity “Exchange Online” -Enabled $True -EnabledSharedAddressSpace $True -HostsOCSUsers $False -ProxyFQDN “exap.um.outlook.com” -IsLocal $False -VereficationLevel UseSourceVerificationCapture1

Now, create a Hosted Voicemail Policy. This is the policy that get assigned to a user who needs to be enabled for O365 Unified Messaging. To configure the policy, run the command; New-CsHostedVoicemailPolicy -Identity “CloudUMPolicy” -Destination exap.um.outlook.com -Description “Hosted Voicemail Policy for Lync Users” -Organization “contosoltd.onmicrosoft.com”Capture8

In above command, the Organization parameter must be specified as the tenant name and not the shared name space. Ex, contoso.com (shared name space), contosoltd.conmicrosoft.com (Tenant Name). Then run; Invoke-CsmanagementStoreReplication to replicate the changes.

Now to create UM contact object for Subscriber access and Voicemail. Usually for on-premises Exchange, we use OCSUMUtil.exe tool to create these objects. But in O365 UM scenario, we have to use Lync Server management Shell to create these objects. In order to create the contact object for Subscriber Access, the command; New-CsExUmContact -SipAddress sip:exumaa1@domain.com -RegistrarPool lyncPool.domain.com -OU “OU=ExUmContacts,DC=domain,DC=com” -DisplayNumber -AutoAttendant $False -IsSubscriberAccess $True can be used. Capture

Now we are done with Lycn server bits and move on to O365 portal to configure the UM Dial Plan. Log in to the O365 portal using https://portal.office.com and go to the Admin Centre. Capture2

Go to “Exchange” and select “UM Dial Plans”. Select “+” to create a new dial plan. Configure the dial plan name, number of digits of an extension. Select “SIP URI” from the drop down for “Dial plan type”. Set the language, the country code and save the configuration.Capture2


Open the newly configured Dial plan and select “Configure” to configure the rest of the parameters of the dial plan.Capture3


Move to “Outlook Voice Access” tab and configure the DID number for the Subscriber Access in E.164 format as shown below. If you want to use a custom greeting, the audio file can be uploaded in to the “Default Greeting” configuration.Capture


Then go to “Settings and configure the operator extension. This will help to transfer the calls to the operator, if the caller couldn’t be served by the subscriber access component. Capture5


Next to configure the “Dialling Rules”. Dialling rules are configured to dictate which number or number patterns can be routed via the subscriber access as well as the auto attendant. Usually, the dialling rules are configured to route all digits without any restriction, unless if there’s a special requirement that need to configure specific numbers. Configure the dialling rules as mentioned below. This dialling rule will be later on assigned to the Um Mailbox policy as well.Capture6

Now to assigned the dialling rule to the dialling authorization table. Configuring this will allow users who are coming in to the Subscriber Access and Auto Attendant to reach out to internal user extensions. Assign the dialling rule to the authorization table and check “Calls in the same dial plan” and “Allow calls to any extension” components.Capture7

In Transfer and Search tab, verify that the “Transfer to Users are selected. The rest of the parameters can be left alone.Capture8

Now, go back and open up the configured Dial Plan and double click on the default UM Mailbox Policy. This policy get created automatically upon completion of the UM dial plan creation.Capture2

In “General” we usually leave the parameters as it is. If required, some of the UM functionalities can be controlled within this section.Capture15

In The “Pin Policy” tab, you can change the number of digits that are required for the PIN and whether to allow the common patterns for the PIN. Usually, the PIN would be set to 4 digits length and allow common patterns. Capture16

The  “Dialling Authorization” is the most important part within the UM Mailbox policy. If not configured with a number policy, it will not allow calls to be routed to internal extensions from the subscriber access or auto attendant. Assign the previously configured number policy to allow all digits and “Calls within the same UM dial plan” and “Call to any Extension” should be checked.Capture17

This is all that is to the Subscriber Access component of the Exchange UM in O365. The same steps can be followed to configure the Auto Attendant. It will require to configure a UM Object for the Auto Attendant in Lync Server and then need to configure the Auto Attendant within O365.

Putting Lync integration with Skype under the Microscope


The purpose of this article to explore the integration between Lync and Skype. This was enabled ages ago for Voice. And recently in November, Microsoft has announced the availability of Video between Lync and Skype. This was a feature that everyone’s waiting for. There were rumors that Microsoft will enable this feature on the upcoming Skype for Business server but luckily, it jumped the gun before that.Capture

The functionality was enabled couple of months ago in mid November and it worked for a while. And it got disabled due to some reason (could be bugs) till further notice. Now, it’s back once again. The integration only works with the Skype client version 7.1.0.105 which can be downloaded from Skype web siteskypeversion

Since the acquisition of Skype, Microsoft mentioned the the voice coded that’s been used in Skype, is the most optimised voice codec to send voice over wide area network. The codec is called “Silk“. This codec was embedded to Lync’s SDP list by a Cumulative Update but, it’s not getting used so far. Below is a SDP list of an INVITE from Lync 2013 client to another Lync 2013 client. LynctoLync

Even though it’s offering Silk, the client settle with the MSRTA codec which is the heights on priority. The Silk codec is lost between the negotiation process.settle on

So getting back to the topic in hand and looking at a call between Skype and Lync, If the call originated with Skype, Skype surprisingly wants the call to be established over G722 as a priority even though Microsoft stated that it will be using Silk as a priority form going forward;

“This includes built-in security, with enterprise class encryption of both media and signaling using TLS and SRTP, enabled by default. It includes connectivity, with standards-based traversal of personal and corporate firewalls using STUN, TURN and ICE. It includes high quality, scalable video using the industry standard H.264 SVC codec. Finally, it includes the SILK audio codec as the default choice for Lync to Skype calls. SILK is used for billions of minutes of audio calls every day, and provides a phenomenal balance between audio quality, bandwidth utilization and power consumption”

Below is the snapshot of the SDP list that getting offered within the invite it self from from Skype to Lync;SkypetoLync

But, Lync client always uses MSrta codec. So the call between Lync and Skype will settle for MSrta that is the 3rd in priority even though Lync is capable of working with G722 which is the highest priority next to Silk.Lynctoskype settle

In the other hand, calling from Lync to Skype, Lync offers MSrta as a priority and Skype settle down with MSrta without any drama. Again, no Silk in the picture.Capture2

As for the Video, Microsoft has introduced H.264 SVC to support natively with Lync 2013 which allows the client to VC end points such as Polycom without having to use MSrtv as the video codec. For video integration between Lync and Skype, Microsoft have used H.264 SVC instead of the MSrtv. The SDP list that offered from Lync has the H.264UC as the priority and the call get established over H.264 SVC. Video

I was under the impression that Lync will use Silk when it’s communicating with Skype and it was confirmed by Microsoft that it will be the case. Unfortunately, it’s not. As clearly shown above, it use MSrta as audio and as promised, it use H.264 SVC as video.

So hopefully when Skype for Business comes out, it will use the full strength of Silk codec for audio and we could hope for a better voice quality than what we are getting now in the future.

Configuring Unified Contact Store (UCS) with Lync server 2013


One of the interesting features that supports when both the Lync server and Exchange server are on 2013 platform, is the Unified Contact Store. The purpose of the UCS is that to store a Lync enabled user’s contact in Exchange server instead of Lync server it self. One of the other benefit is that, to use Outlook to manage contacts instead of Lync 2013 client.

Usually the default contact list provider for Lync client is the Lync server. When you go in to the configuration information of the Lync client, you can see that Lync Server is right in front of the “Contact List Provider”Capture

After configuring UCS and enabling UCS for a user account, the default contact list provider will change to UCS as shown below. From that point onwards, the contact list if uploaded to Exchange server and will be managed by Exchange.Capture23

Going in to the configuration, the first step would be to configure the server to server authentication (oAuth) between Exchange server and Lync server. It must require a certificate that issued by a trusted issuing provider and configuring each other as partner application.

Certificate requirement

I have covered the certificate configuration steps in a previous article that described configuring integration between OWA and Lync server 2013. If this integration is in place, likely possibility is that the certificate configuration is already done. Else, you need to make sure that the Lync servers and Exchangers servers are having certificate that must be issued by a trusted issuing authority or an internal root certificate authority. It will not going to work if the Exchange is on self signed certificate.

Partner application configuration in Exchange Server 2013

Before configuring the partner application within Lync server, It requires to know the exchange auto discover URL. To get the auto discover URL, run the command;

Get-ClientAccessServer | Select-Object Name, AutoDiscoverServiceInternalUri | Format-List

and note down the URLCapture13

To configure the Lync server as a partner application for exchange, you need to run the below command in exchange management shell. Within EMS, navigate in to the “Scripts” folder and execute the EnterprisePartnerApplication.ps1 script with the switch -AuthMetaDataURL and -ApplicationType. So the complete command would looks like;

“C:\Program Files\Microsoft\Exchange Server\V15\Scripts\Configure-EnterprisePartnerApplication.ps1 -AuthMetaDataUrl ‘https://<Lync FE server\Pool FQDN>/metadata/json/1’ -ApplicationType Lync” Capture16

Once done, restart the IIS services on the CAS server and we are done with Exchange.Capture17

Partner application configuration in Lync Server 2013

Before going in to the partner application configuration, oAuth configuration need to be set with the exchange auto discover URL. The purpose of this is to get the Lync server to know where to find the auto discover URL. The command that need to be run on Lync management would be;Capture15

Now to move in to partner application configuration, within lync server, you need to configure the exchange server as a partner application. To do this, the command New-CsPartnerApplication including -MetaDataURL and -ApplicationTrustLevel. The MetaDataURL would be something like;

https://autodiscover.domain.com/autodiscover/metadata/json/1

The full command that need to be run on Lync Server management shell would look like;

New-CsPartnerApplication -Identity Exchange -ApplicationTrustLevel Full -MetadataUrl “https://autodiscover.domain.com/autodiscover/metadata/json/1&#8221; Capture18

That’s all there is to do with the server side configuration. Now to enable UCS for clients and do some testing. UCS configuration is there inside the “UserServicePolicy”. Usually in a deployment there will be only “Default” user policy. It’s not recommended to go ahead and enable the UCS within the default policy. Best practice is to configure a custom policy and assign that to pilot users before rolling it up to production.

To configure a custom UserServicePolicy, run the command New-CsUserServicePolicy as mentioned below;Capture21

Now go ahead and enable the the pilot users for above configured user policy by running the command Grant-CsUserServicePolicy as mentioned below;Capture22

To test the exchange connectivity, run the command Test-CsExStorageConnectivity with the user SIP URI. It might take some time to get the changes to reflect to exchange.Capture19

And finally to test the UCS availability for the user account, run Test-CsUnifiedContactStore command as shown below;

Test-CsUnifiedContactStore -UserSipAddress testuser@domain.com -TargetFqdn lync.domain.com –UserCredential $credCapture

The result would be;Capture2

At this point, the test user is successfully enabled for UCS and in client configuration, it should change the “Contact List Provider” form “Lync Server” to “UCS”

Configure OWA integration between Lync Server 2013 and Exchange 2013


Integrating OWA with Lync Server 2013 will support IM and Presence when logged in to the OWA from internal LAN as well as from the Internet. By default, this integration is not in place even though both the platforms are in 2013 version. Having both platforms in 2013 version allows you to get more out of the integration. Apart from OWA integration, it supports UCS (Unified Contact Store) and Archiving in Exchange server so that you don’t need an additional SQL database instance for this. So in my setup, i have deployed an Exchange server 2013 in one box (Venguard-Pluto.ucetechie.com) and Lync Server 2013 Standard Edition (Venguard-Earth.ucetechie.com. When i fire up the OWA for the first time, i don’t see presence against my name;Capture1

To begin with the integration process, it’s pretty straight forward. All you have to do is;

  • Configure certificate in Exchange
  • Configure Exchange to allow IM and Presence
  • Configure Exchange web services to support Lync Server 2013
  • Configure Trusted Application pool in Lync Server 2013 to integrate Exchange CAS

Let’s jump in to Configure certificate in Exchange, If the Exchange services are configured with the self signed certificate, that need to changed to a CA generated certificate. It can be a certificate that was generated from a public trusted CA or it could be a certificate generated from an internal root CA. The bottom line is, the Lync server must trust the certificate that getting presented by the Exchange server. As you can see below, the certificate that I have in my exchange server is a certificate that was generated from an internal trusted root CA. It’s the same CA that issued the certificate for Lync Server. Note the Thumb Print of the certificate.Capture2

Below are the services that I enabled for this certificate. I’ve enabled it for all the services that I use within the Exchange server and discarded the Self Signed certificate. The primary services that this certificate need to be enabled for are, Exchange Web Services internal, Auto Discover and IIS)Capture3

Now, Configure Exchange to allow IM and Presence, Run the command, Get-OwaVirtualDirectory | Set-OwaVirtualDirectory -InstantMessagingEnabled $True -InstantMessagingType OCS. Thic command will configure the OWA virtual directory to support IM & P with Lync Server.Capture4

Configure the Mailbox policy to enable IM & P. By default, this feature is disabled. If you want certain users not to have this feature, you can configure a different mailbox policy apart from the default and enable IM & P for the new policy and leave the default as it is. I have configured the default policy to enable IM & P as mentioned belowCapture5

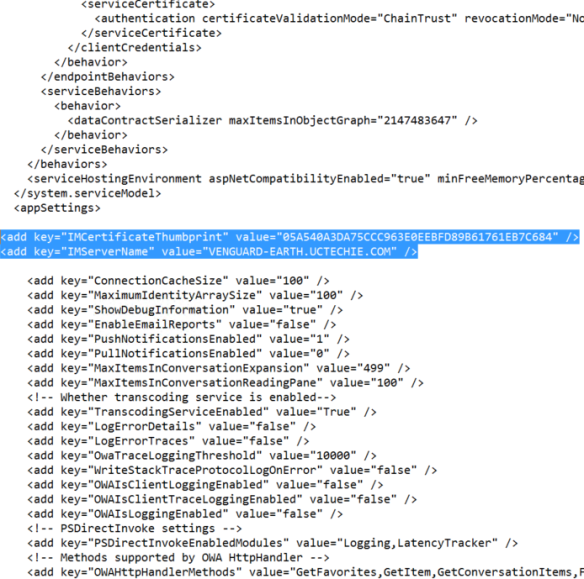
Next step is to Configure Exchange web services to support Lync Server 2013, Navigate to “C:\Program Files\Microsoft\Exchange Server\V15\ClientAccess\Owa” in the CAS server and open the “Web.config” file with note pad. Keep in mind to take a backup copy before anything. Add the Keys, “<add key=”IMCertificateThumbprint” value=”EA5A332496CC05DA69B75B66111C0F78A110D22d”/>” “<add key=”IMServerName” value=”atl-cs-001.litwareinc.com”/>” Within the <appSettings> component as shown below. The “IMCertificateThumbprint” is the Exchange Server certificate Thumb Print and “IMServerName” is the FQDN of the Lync Server 2013 Front End server or Pool. If you have multiple CAS servers, you need to do this on them as well.Capture6

After the above change on the config file, you need to recycle the application pool of the OWA. You can do this by using the IIS admin console and navigate in to the OWA Application pool. Or, run the command C:\Windows\System32\Inetsrv\Appcmd.exe recycle apppool /apppool.name:”MSExchangeOWAAppPool”Capture7

Now, we are done with Exchange. Fire up the OWA and see that the page comes up and it behaves as expected. According to Microsoft, if both Lync and Exchange are on 2013 version, you should see the presence against your name and there’s nothing you need to do with Lync Server (Given that you have the EWS working fine internally as well as through the internet). But, I prefer configuring the Lync Server end so that the integration is complete. In Lync Server side, I need to Configure Trusted Application pool in Lync Server 2013 to integrate Exchange CAS Fire up the Lync Management Shell and run the command “Get-CsSite” to get the Site ID.Capture8

Create a Trusted Application pool as the Exchange CAS server using below command “New-CsTrustedApplicationPool -Identity -<Exchange CAS FQDN (as mentioned in the certificate)> -Registrar <Lync Server Pool or FE FQDN> -Site <Site ID> -RequiredReplication $False The key thing here is that making sure the certificate name and the CAS FQDN is the same in above command. It has to be same with the setup as well.Capture9

Configure a Trusted application as “OutlookWebAccess” using the command “New-CsTrustedApplication -ApplicatioID OutlookWebAccess – TrustedApplicationPoolFQDN -<Exchange CAS FQDN> -Port <Vacant Port number>. You can use any port number as you prefer as long as it’s not being used by any other application.Capture10

Publish the configuration by running “Enable-CsTopologyCapture11

It’s all done now. Open up the OWA and see if you can see the presence next to your name. Capture12

If it’s not appearing still, have a look at the Exchange server event logs in CAS server and see if you have TLS related errors. The usual culprit of this integration to break are the certificate related issues.                

October 2014 update for Lync for Mac 2011 (Version 14.0.10)


Microsoft has released the new version of Lync for Mac 2011. And this one is October 2014 update with version 14.0.10. The update file can be downloaded from,http://www.microsoft.com/en-us/download/details.aspx?id=36517

Before installing this update, there are couple of Prerequisites that need to be satisfied. And those are,

  • To run install the update file, there have to be an older version of Lync for Mac client installed on the computer
  • The computer must be running on Mac OS X version 10.5 or later

The most impotent thing with this update is that, This enables the most wanted “View call history” on the client requirement and several other features and bug fixes mentioned below,

  • 3007886 Update enables users to view call history in Lync for Mac 2011
  • 3007885 Update for Lync for Mac 2011 enables users to store conversation history on an Exchange server
  • 3007884 Location is not displayed in Lync for Mac 2011 when users join a wireless network
  • 3007883 Error “One or more selected contacts cannot receive your calls” when you forward calls in Lync for Mac 2011
  • 3007881 Delegation relationship is broken after a delegate signs in to Lync for Mac 2011
  • 3007879 Computer shutdown is not processed when Lync for Mac 2011 is running
  • 3007878 Update implements media resiliency mode in Lync for Mac 2011
  • 3007877 Dial pad disappears when a user who is not enabled for EV joins a video conference or a video call in Lync for Mac 2011
  • 2909659 Update enables users to interact with a contact from the call history in Lync for Mac 2011

Installation of this update is fairly straight forward. Download the .dmg file, mount the file in to mac OS and install the application.

Lync Server 2013 September Update (5.0. 8308.815) is now available


Microsoft has released the September update for Lync Server 2013 (5.0. 8308.815) last week. Just like the ones that came before this update, there are several bug fixes included in to this update. List of the bug fixes that had been addressed are stated below;

  • Update for Central Management Server
    2910244 Description of the cumulative update 5.0.8308.577 for Lync Server 2013 Central Management Server: January 2014
  • Update for Backup Service
    2910243 Description of the cumulative update 5.0.8308.577 for Lync Server 2013 Backup Service: January 2014
  • Update for Standard or Enterprise Edition server (Front End Servers and Edge Servers)
    2987510 September 2014 Cumulative Update 5.0.8308.815 for Lync Server 2013 (Front End Server and Edge Server)
  • Update for Unified Communications Managed API 4.0, Core Runtime 64-bit
    2995717 September 2014 Cumulative Update 5.0.8308.815 for Lync Server 2013, Unified Communications Managed API 4.0 Runtime
  • Update for Web Components server
    2995718 September 2014 Cumulative Update 5.0.8308.815 for Lync Server 2013, web components server
  • Update for Core Components
    2987511 September 2014 Cumulative Update 5.0.8308.815 for Lync Server 2013 core components
  • Update for Call Park Service
    2881703 Description of the cumulative update 5.0.8308.556 for the Lync Server 2013, Call Park service: October 2013
  • Update for Conferencing Announcement
    2881701 Description of the cumulative update 5.0.8308.556 for Lync Server 2013, Conferencing Announcement: October 2013
  • Update for Conferencing Attendant
    2995716 September 2014 Cumulative Update 5.0.8308.815 for Lync Server 2013, Conferencing Attendant
  • Update for Mediation server
    2881699 Description of the cumulative update 5.0.8308.556 for Lync Server 2013, Mediation Server: October 2013
  • Update for Administrative Tools
    2967485 August 2014 Cumulative Update 5.0.8308.738 for Lync Server 2013, Administrative Tools
  • Update for Web Conferencing server
    2937314 August 2014 Cumulative Update 5.0.8308.738 for Lync Server 2013, Web Conferencing Server
  • Update for Unified Communications Managed API 3.0 Workflow APIs
    2835438 Description of the cumulative update 5.0.8308.420 for Lync Server 2013, UCMA 3.0 Workflow APIs: July 2013
  • Update for Conferencing server
    2835434 Description of the cumulative update 5.0.8308.420 for Lync Server 2013, Conferencing Server: July 2013
  • Update for Persistent Chat server
    2835433 Description of the cumulative update 5.0.8308.420 for Lync Server 2013, Persistent Chat: July 2013
  • Update for Windows Fabric
    2967486 August 2014 Cumulative Update 5.0.8308.738 for Lync Server 2013

Download the Update Installer from “http://www.microsoft.com/en-us/download/details.aspx?id=36820” URL and follow the instructions.

Keep in mind to update the Back End databases and run Windows Fabric update on the Front End servers as well as the Edge servers.

Optimizing VVX deployment with pre configured configuration files.


While ago I posted an article explaining how to use the configuration files to deploy and configure VVX devices over a provisioning server. If anyone who used the .cfg files on the provisioning server might realize that, there are lot of parameters to be configured so the the device deployment can be streamlined and make it more user friendly in the process.

In this article, I have shared a set of pre configured ans optimized .cfg files that can be used with any Lync server deployment. Granted that some of the parameters need to be changed according to the environment and I will explain what need to be changed and why.

There are 6 configurations files all together which address different segment of the device configuration.

Starting with Device.cfg. This configuration file set to configure following parameters in VVX device,

  • Set Device Base Profile as Lync
  • Change default administrator password (In version 5.1.1 Revision B, Device comes up with warning message if the Administrator password remains as default)
  • Enable Device update
  • Specify device update location
  • Time server configuration

The Feature.cfg file specify the common set of features on the device such as, Call lists, Miss call alerts, Contact Directory. In this file, the specified parameters are below,

  • Removed the “Corporate Directory” option on the device. Within “Directory”, the device will have “Lync Directory” option so that the contacts can be searched and called. In many cases, I have seen users get confused with two different set of directory options hence removing the “Corporate Directory” option
  • URI Dialling disabled. VVX generally have URI dialling enabled. When this feature is enabled, all inbound and outbound calls display as the full SIP URI (sip:+6123456789@contoso.com.au). Users who are used to have legacy PBX end points does not like this at all. They want to see just the number or the name without any other information

Sip-Interop.cfg is the most important one. This one controls the device registry intervals as well as the SIP Proxy server related parameters. In this configuration file, most of the parameters haven’t changed. But, the ones that were changed are below,

  • Device registration expiry interval. Default device registration expiry interval is 3600 seconds. If the devices is registered in an SBA, then if the SBA goes down, the devices still shows as signed in but, it actually be in an unknown condition till the registration expires. Have 3600 seconds is too much in that scenario. In this configuration file, the interval has changed to 120 seconds. This cannot be less than that. If it’s less, then users will experience the frequent device sign in and sign out.
  •   VOIP Server configuration. Here, the VOIP server interoperability is set to Lync 2010 and the transport method is set to TLS.
  • SDP early media disabled. I have noticed when this parameter is enabled, device sometimes does not provide a ringing tone to the end user. The dialled call will be blank till it get picks up.
  • Apply Digitmap Locally. Enabling this parameter will make the device to adhere to the Lync server normalization rules which are assigned to the user.

The Site.cfg file is configured to set daylight saving time in to the device. If the daylight saving is applicable, the start and stop times need to be configured,

  • SNTP address of the time Server
  • Daylight saving enable or disable. If enabled, start and stop times

Lync.cfg file configured to set BToE enabled. But, in version 5.1.1 Revision B, Polycom have set the BToE as disabled and given that the configuration file version is 5.2, this configuration file doesn’t really enable BToE on version 5.1.1 Revision B firmware. But, it can be used on Version 5.2.

The Cer.cfg is set to import the root CA in to the device. 90% of the devices that I have deployed were able to get the certificate without uploading manually. In case the device fail to pick up the certificate, copy and paste the hash file of the CA certificate in to the configuration parameter.

Finally, the Master configuration file 000000000000.cfg. All the above mentioned configuration files are specified in this master configuration file. When the device boots up, it will fetch the configuration mentioned on this files and get configured based on parameters which are configured on each sub configuration file.

The configuration files can be downloaded from, https://onedrive.live.com/redir?resid=6329AF91D1E5ADBC%21704

Follow my other article if you are new to the VVX setup. https://thamaraw.com/2014/04/02/configuring-the-provision-server-to-setup-polycom-vvx-devices-to-support-lync/

Lync Server CU 5 KB 2809243 (August Update)


Microsoft has released the August update for Lync Server 2013 CU 5. Applying the update is pretty much straight forward as the ones that released before this.

The update can be downloaded from below URL. Take a look at the release notes and issues that has been addressed with this update. And most importantly, don’t forget to update the Back End Database.

http://support.microsoft.com/default.aspx?kbid=2809243

Happy updating folks 🙂


Configure Analogue Extensions on Sonus SBC to work with Lync Server 2013


Objective of this article is to guide how to configure Analogue extensions sitting on Sonus SBC 1000\2000 FSX module to communicate with Lync server 2013. Integration with having the FSX modules on the SBC chassis is much less complicated that the FSX is sitting on a different Gateway.

In that case, there will be a licensing concern when it comes to Sonus gateway. To do this, you would probably need Registrar license as well as SIP\Transcoding license. But, in Sonus SBC version 3.1.x does have an option called “RTP Proxy”. This parameter configured in Routing table against the specific route allows RTP to flow without a Transcoding license given that both end use the same codec.

Now back to the subject. The configuration steps would be pretty straight forward,

  • Configure Analogue contact objects in Lync server
  • Configure a CAS Signalling Profile
  • Configure Transformation table
  • Configure a CAS Signalling Group
  • Configure Routing Tables

Configure Analogue contact objects in Lync server

This step is much like configuring a Common Area device. Instead of New-CsCommonAreaDevice, we use New-CsAnalogueDevice. Use the Lync management Shell to run below command. Replace site specific parameters for the highlighted sections.

New-CsAnalogDevice -LineUri tel:+14255556001 -DisplayName “Building 14 Receptionist” -RegistrarPool redmond-Cs-001.litwareinc.com -AnalogFax $False -Gateway 192.168.0.240 -OU “ou=Telecommunications,dc=litwareinc,dc=com

There’s no need to grant a voice policy because the Lync server doesn’t have any sort of authority over the analogue extension.

Configure a CAS Signalling Profile

Jump in to the SBC and navigate in to Settings > CAS. In CAS Signalling Profiles, create a new FSX signalling profile as shown below.CAS Profile

Configure Transformation table 

Transformation Table has to be created so that the numbers coming in to the Analog Extensions and going out to the Lync server are properly normalized. There has to be 2 sets of transformation tables. One set is “To FSX from Lync server” and another set for “To Lync Server from FSX”

To FSX from Lync server

What this rule does is that, a call comes as +6192931234 to 92931234 (The analogue Extension). This rule depends on how the Lync server send the numbers to the SBC. In my case, it’s the full E.164 number. CaptureCapture

To Lync Server from FSX

What this set of rule does is that, It coverts dialed 4 digits Extension numbers in to full E.164 number so that the Lync server can identify where that call to be sent to. CaptureCapture

Configure a CAS Signalling Group

Now to create a Signalling Group for the FSX module. This is where the physical FSX port will get the extension number and get associated with a CAS profile. For the time being, set the Call Routing Table as “Default” since we haven’t created it.  Configure a Signalling group as shown in below snapshot.Untitled picture

Configure Routing Tables

Routing Table is where everything get bonded together. It specifies where the call should go to and which Transformation Tables that it have to use. There gave to be 2 Routing tables. One is “From Lync Server 2013” and another as “From Analog Extensions

From Lync Server

This one specifies where the call to be sent to if it’s coming from lync server. In this instant, “To Analogue Extension“. Configure the routing table as shown in below snapshot.Untitled picture

From Analog Extensions

This one specifies where the call to be sent to if it’s coming from Analogue Extensions. In this instant, “To Lync Server“. Configure the routing table as shown in below snapshot.Untitled picture

Now the configuration is done. Based on this configuration, If a Lync user dials +6192931234, the call will hit on the Analog extension configured as 92321234. And the analogue extension make a call to extension 1212 (Lync User), this will get normalize in to +61892931212 and get forwarded in to Lync Server.