Integrating OWA with Lync Server 2013 will support IM and Presence when logged in to the OWA from internal LAN as well as from the Internet. By default, this integration is not in place even though both the platforms are in 2013 version. Having both platforms in 2013 version allows you to get more out of the integration. Apart from OWA integration, it supports UCS (Unified Contact Store) and Archiving in Exchange server so that you don’t need an additional SQL database instance for this. So in my setup, i have deployed an Exchange server 2013 in one box (Venguard-Pluto.ucetechie.com) and Lync Server 2013 Standard Edition (Venguard-Earth.ucetechie.com. When i fire up the OWA for the first time, i don’t see presence against my name;
To begin with the integration process, it’s pretty straight forward. All you have to do is;
- Configure certificate in Exchange
- Configure Exchange to allow IM and Presence
- Configure Exchange web services to support Lync Server 2013
- Configure Trusted Application pool in Lync Server 2013 to integrate Exchange CAS
Let’s jump in to Configure certificate in Exchange, If the Exchange services are configured with the self signed certificate, that need to changed to a CA generated certificate. It can be a certificate that was generated from a public trusted CA or it could be a certificate generated from an internal root CA. The bottom line is, the Lync server must trust the certificate that getting presented by the Exchange server. As you can see below, the certificate that I have in my exchange server is a certificate that was generated from an internal trusted root CA. It’s the same CA that issued the certificate for Lync Server. Note the Thumb Print of the certificate.
Below are the services that I enabled for this certificate. I’ve enabled it for all the services that I use within the Exchange server and discarded the Self Signed certificate. The primary services that this certificate need to be enabled for are, Exchange Web Services internal, Auto Discover and IIS)
Now, Configure Exchange to allow IM and Presence, Run the command, Get-OwaVirtualDirectory | Set-OwaVirtualDirectory -InstantMessagingEnabled $True -InstantMessagingType OCS. Thic command will configure the OWA virtual directory to support IM & P with Lync Server.
Configure the Mailbox policy to enable IM & P. By default, this feature is disabled. If you want certain users not to have this feature, you can configure a different mailbox policy apart from the default and enable IM & P for the new policy and leave the default as it is. I have configured the default policy to enable IM & P as mentioned below![]()
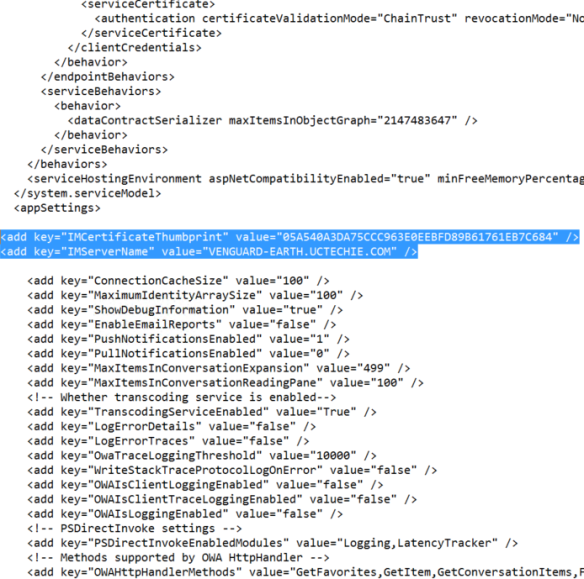
Next step is to Configure Exchange web services to support Lync Server 2013, Navigate to “C:\Program Files\Microsoft\Exchange Server\V15\ClientAccess\Owa” in the CAS server and open the “Web.config” file with note pad. Keep in mind to take a backup copy before anything. Add the Keys, “<add key=”IMCertificateThumbprint” value=”EA5A332496CC05DA69B75B66111C0F78A110D22d”/>” “<add key=”IMServerName” value=”atl-cs-001.litwareinc.com”/>” Within the <appSettings> component as shown below. The “IMCertificateThumbprint” is the Exchange Server certificate Thumb Print and “IMServerName” is the FQDN of the Lync Server 2013 Front End server or Pool. If you have multiple CAS servers, you need to do this on them as well.
After the above change on the config file, you need to recycle the application pool of the OWA. You can do this by using the IIS admin console and navigate in to the OWA Application pool. Or, run the command C:\Windows\System32\Inetsrv\Appcmd.exe recycle apppool /apppool.name:”MSExchangeOWAAppPool”
Now, we are done with Exchange. Fire up the OWA and see that the page comes up and it behaves as expected. According to Microsoft, if both Lync and Exchange are on 2013 version, you should see the presence against your name and there’s nothing you need to do with Lync Server (Given that you have the EWS working fine internally as well as through the internet). But, I prefer configuring the Lync Server end so that the integration is complete. In Lync Server side, I need to Configure Trusted Application pool in Lync Server 2013 to integrate Exchange CAS Fire up the Lync Management Shell and run the command “Get-CsSite” to get the Site ID.
Create a Trusted Application pool as the Exchange CAS server using below command “New-CsTrustedApplicationPool -Identity -<Exchange CAS FQDN (as mentioned in the certificate)> -Registrar <Lync Server Pool or FE FQDN> -Site <Site ID> -RequiredReplication $False The key thing here is that making sure the certificate name and the CAS FQDN is the same in above command. It has to be same with the setup as well.
Configure a Trusted application as “OutlookWebAccess” using the command “New-CsTrustedApplication -ApplicatioID OutlookWebAccess – TrustedApplicationPoolFQDN -<Exchange CAS FQDN> -Port <Vacant Port number>. You can use any port number as you prefer as long as it’s not being used by any other application.
Publish the configuration by running “Enable-CsTopology“![]()
It’s all done now. Open up the OWA and see if you can see the presence next to your name. 
If it’s not appearing still, have a look at the Exchange server event logs in CAS server and see if you have TLS related errors. The usual culprit of this integration to break are the certificate related issues.
