Microsoft Teams License requirement in AudioCodes Mediant SBC


I recently had a shocking surprise from AudioCodes, right after i upgrade the Firmware of a production Mediant 800 SBC that use for Direct Routing With Teams. I was asked to upgrade the firmware to the latest available (V 7.20A.250.003) to fix a media related issue and ended up having outbound PSTN calling completely broken.

At that time, i didn’t know what exactly happened and i used the SYSLOG Server to capture an outbound calls to see what’s really going on. In the log file, it shows 500 Internal Server error and “User Agent Not Licensed”.

^^( 619193) —- Outgoing SIP Message to 52.114.7.24:5129 from SIPInterface #5 (Teams IF) TLS TO(#825373264) SocketID(4459) —-
^^SIP/2.0 500 Server Internal Error
Via: SIP/2.0/TLS 10.0.0.5:5061;branch=z9hG4bK5421869
From: <sip:sip-du-a-as.pstnhub.microsoft.com:5061>;tag=5e90f471-bde2-4838-bc73-f02e01be778a
To: <sip:admin@PERSBC01.test.com>;tag=1c297288434
Call-ID: 15caad8d-6788-474a-85f8-5c4be183d8d5
CSeq: 1 OPTIONS
Reason: SIP ;cause=500 ;text=”User Agent Is Not Licensed”
Content-Length: 0

I have seen couple of Mediant VE deployments losing the license before upon restart. I though it could be the same here. But, the license was intact and exactly the same as before.

I ended up opening a support ticket with urgent priority. It end up having to apply a license key to enable Direct Routing with Teams on SBC. Such a requirement was never there and no one knew such a license exist. It happens to be that AudioCodes have implemented this license requirement and it was not communicated widely in to the public. capture

In above snapshot, i have underlined the new license addition for Teams.

If you are planning to do a firmware upgrade on any on AudioCodes SBCs that has Direct Routing configured, or planing to have Direct Routing configured in SBC,then request this license first. It will save you time in troubleshooting. Further details regarding this license can be found in AudioCodes Product Notice #0345

August 2014 Cumulative Update for Lync Phone Edition


Microsoft has released the August cumulative update for Lync Phone editions and unlike the ones that released before, this one has addressed some much anticipated features such as,

  • Update enables users who are not enabled for UC or EV to sign in to Lync Phone Edition telephone
  • The lock feature does not prevent users from making calls on a Lync Phone Edition telephone

After applying this update, Lync phone edition device can be signed in to a user who haven’t enabled fro Enterprise Voice. And getting one step closer to the PBX world by seeing the “Phone Lock” feature to not to allow dial outs while it’s locked. The emergency calls however will be able to dial out as long as it’s configured in location Policy. 

The update can be downloaded in http://support.microsoft.com/kb/2988181


Lync Room System (LRS) Configuration


For a long time, Lync did not have a proper “Conference Room” solution to carry out Video Conferences and Content shearing sessions. For those who familiar with solutions such as Crestron Room  Control systems,  the user would be the same. in fact, Crestron has introduced a Room solution called “Crestron RL” to support Lync Room System platform

The features of LRS includes,

  • One touch meeting joining experience. Initiate the meeting by touching meeting request on Room Control device
  • Content sharing and Switching
  • High resolution video

Let’s get on with the configuration. first of all, an Exchange Mailbox is needed. this has to be a room mailbox. Create the mailbox using EMS or EMC. i’ll be using EMS for this configuration.Capture1

Set the created mailbox to automatically process the requests. set the “AddOrganizerToSubject” as False and “RemovePrivateProperty” as FalseCapture2

Configure the Mail TIp. I’ve configured a sample message for this.Capture3

If the meeting request to be sent to remote LRS, then you need to add remote domains and enable Transport Neutral Encapsulation Format (TNEF).Capture4

Go to the AD and set a password for the newly created accountCapture5

When a Room Mailbox or a Resource Mailbox created in Exchange, it’ll get created as a disabled account. this account need to be enabled so that it can configure in Lync Server.Capture6

Log in to the Lync Server. go to the Lync Server management Shell and configure the Meeting Room with newly created accountCapture7

Enable Enterprise Voice to the meeting room account. enabling EV is optional but, if the EV is not enabled, meeting attendees won’t be able to dial PSTN and add users in to the meeting Capture9

Configure a Line URI for the for the meeting room Capture8

Set the Enable Room System AuthorizationCapture10

Create a custom conference policy for the meeting room and assign in to the room account. below is the recommended configuration for the conference policy

Feature Value Comment
AllowIPAudio

TRUE

Must be true for LRS audio
AllowIPVideo

TRUE

Must be true for LRS audio to work in Meet Now (ad hoc) whiteboard sessions in LRS
AllowMultiView

TRUE

Allows LRS to render multi-view, multiple video streams
AllowParticipantControl

TRUE

Affects Meet Now (ad hoc) whiteboard sessions in LRS
AllowAnnotations

TRUE

Affects Meet Now (ad hoc) whiteboard sessions in LRS
DisablePowerPointAnnotations

FALSE

Affects Meet Now (ad hoc) whiteboard sessions in LRS
AllowUserToScheduleMeetingsWithAppSharing

TRUE

Affects Meet Now (ad hoc) whiteboard sessions in LRS
AllowNonEnterpriseVoiceUsersToDialOut

FALSE

Depends on whether the account is Enterprise Voice (EV) enabled (see the Enabling LRS Accounts for Lync section)
AllowAnonymousUsersToDialOut

FALSE

Depends on whether the account is Enterprise Voice (EV) enabled
AllowAnonymousParticipantsInMeetings

TRUE

Affects Meet Now (ad hoc) whiteboard sessions in LRS
AllowExternalUsersToSaveContent

TRUE

Affects Meet Now (ad hoc) whiteboard sessions in LRS
AllowExternalUserControl

FALSE

Affects Meet Now (ad hoc) whiteboard sessions in LRS
AllowExternalUsersToRecordMeeting

FALSE

Affects Meet Now (ad hoc) whiteboard sessions in LRS
AllowPolls

TRUE

N/A in Meet Now (ad hoc) meetings, but LRS can respond to polls on the screen at the front of room
AllowSharedNotes

TRUE

N/A in Meet Now (ad hoc) meetings, but LRS can respond to polls on the screen at the front of room
EnableDialInConferencing

TRUE

Affects Meet Now (ad hoc) whiteboard sessions in LRS
EnableAppDesktopSharing

Desktop

Affects Meet Now (ad hoc) whiteboard sessions in LRS
AllowConferenceRecording

FALSE

N/A for LRS. If TRUE, a remote party could record
EnableP2PRecording

FALSE

N/A for LRS. If TRUE, a remote party could record
EnableFileTransfer

TRUE

N/A
EnableP2PFileTransfer

TRUE

N/A
EnableP2PVideo

TRUE

Enables the LRS client to participate in peer-to-peer video sessions
AllowLargeMeetings

FALSE

N/A
EnableDataCollaboration

TRUE

Affects Meet Now (ad hoc) whiteboard sessions in LRS
MaxVideoConferenceResolution

VGA

Ignored by Lync 2013, LRS uses HD1080
MaxMeetingSize

250

Affects Meet Now (ad hoc) whiteboard sessions in LRS
AudioBitRateKb

200

See note at the end of the table*
VideoBitRateKb

5000

This is the maximum outbound video bit rate allowed. LRS can send one 1080 stream along with pano (if RoundTable is used) at this bit rate. *
AppSharingBitRateKb

5000

See note at the end of the table*
FileTransferBitRateKb

5000

N/A
TotalReceiveVideoBitRateKb

20000

We recommend that you set this as high as possible. The effective bandwidth depends on network conditions at the time of conferences.*
EnableMultiViewJoin

TRUE

Must be TRUE for LRS to ensure multi-view video streams

This is all it require to configure LSR in Lync Server.

Substitution for FIM in Lync Server Resource Forrest\Domain Deployment


Deploying Lync Server in Multi Forrest\Domain require a FIM (Forefront Identity Manager) to replicate the Object SID from user domain to resource domain.

IC444772FIM requires license for a SQL Instance additional WIndows Server and FIM it self. This article describes how to create users in resource domain by copying the attributes from customer domain. Also enable the users in Lync and configure Enterprise Voice by getting the Line URI from a .csv file.

Before getting to users creation, a Trust relationship (Oneway Forests Trust) need to be configured between two domain which will require to get the attributes from customer domain. I’m not going to cover the Trust relationship configuration in this article. below are the users configured in customer domain. notice the “Lync _Users” group. only the users which are added in to this group will get created.

test10

notice the ObjectSid of the “Demo Eight” user

test11

Once the trust relationship is configured with the resource domain and active, run the below command in windows Powershell as an Administrator. change the domain names appropriately (contoso.com = Customer Domain, fabrikam.com.com=Resource Domain)

Import-Module ActiveDirectory

$domain = “dc=contoso,dc=com”

$DC = “contoso-dc01.contoso.com:3268”

$ADSrcGrp = Get-ADGroup -SearchScope Subtree -SearchBase $domain -Server $DC -LDAPFilter “(name=lync_users)”

Get-ADUser -SearchScope Subtree -SearchBase $domain -Filter ‘memberOf -RecursiveMatch $ADSrcGrp.DistinguishedName’ -Server $DC -Properties ObjectSID,name,samAccountName,displayName,givenName,surName,mail | ForEach-Object {New-ADUser -Name $_.name -SamAccountName $_.samAccountName -DisplayName $_.displayName -GivenName $_.givenName -SurName $_.surName -EmailAddress $_.mail -otherAttributes @{‘msRTCSIP-OriginatorSid’=$_.ObjectSID} -Path “OU=AU,DC=fabrikam,DC=local” -UserPrincipalName “$($_.samaccountname)@fabrikam.local” -AccountPassword (ConvertTo-SecureString -AsPlainText “P@ssw0rd” -Force) -PasswordNeverExpires $true -Enabled $false}

Users will be created in the below configured OU as disabled users.

test13

notice the msRTCSIP-originatorsid value of “Demo Eight” user.

test21

Now to enable user in to Lync Server. run the below script to enable the user to Lync Server. Specify the Line URI s in to the .csv file to configure Enterprise Voice in to enabled users

Get-CsAdUser -OU “OU=AU,DC=contoso,DC=com” | Enable-CsUser -RegistrarPool “lyncfe01.fabrikam.local” -SipAddressType firstlastname -SipDomain contoso.com

import-csv “c:\Script\EV_Users.csv” | Select-Object * | foreach-object {set-csuser -identity $_.identity -sipaddress $_.SipAddress -LineURI $_.LineURI -EnterpriseVoiceEnabled $True}

this is what the content of the .csv file should looks like

SIPAddress LineURI Identity
Sip:demo.five@contoso.com tel:+612001 Demo Five
sip:demo.six@contoso.com tel:+612002 Demo Six
sip:demo.one@contoso.com tel:+612003 Demo one

All the users should be now enabled for lync and enabled for Enterprise Voice with a Line URI

test22

now it’s time to test a user to verify that all works fine.

test24

Client signed in successfully with the end user credentials.

Step by Step guide to deploy Lync Server 2010 Edge Server


Lync Server Edge Server’s role is to provide access to the users who are connecting via the internet. Edge server usually deployed in DMZ (perimeter zone) of the network with dual NIC and having one leg (NIC) in external network while the other one in internal network.

below is a typical topology set up for an Edge Server.

Capture0

Internal interface for the Edge Server uses a certificate from Private CA while the External interface of the Edge Server use public Certificates. There are 3 services that run in Edge server which requires a Public Certificate. this will be coved later in the deployment process. let’s divide this guide in to two segments.

1. Infrastructure configuration to support Edge Server

2. Application Server deployment

Infrastructure configuration to support Edge Server

unlike the Front End server, Edge server doesn’t have much in internal infrastructure. there are several SRV records and A records that need to be created in the public domain for clients to discover the Lync Server and for the federation with partners.

  • sip.uctest.com
  • media.uctest.com
  • webcon.uctest.com
  • _sip._tls.ustest.com:443 resolve against sip.uctest.com
  • _sipfederationtls._tcp:5061 resolve against sip.uctest.com

_sip record is the record that assist clients to discover the domain and the Edge Server to connect to. if this record was not set, clients need to be configured manually to point to the correct Edge Server

_sipfederationtls record is configured to allow partners to discover Lync server platform and get connected via federation. This method is called open Federation. There are some organizations that doesn’t like this method. in that case, allowed domain and access edge server record need to be configured in Lync Server control panel to allow federation with that domain.

Unlike any other Lync Server application servers, Edge server is not recommended to join to Domain due to it’s security vulnerability. for this, the domain suffix will be configured as mentioned below

Capture6

Now to the second step

Application Server deployment

 Check http://technet.microsoft.com/en-us/library/gg398835.aspx to get an idea of the Hardware requirement for Edge Server. Check http://technet.microsoft.com/en-us/library/gg412883.aspx to understand the OS and additional software requirement.

prerequisites required to deploy lync Server 2010 Edge Server

  • Dot NET 3.5.1 features
  • Desktop Experience
  • Quality Windows Audio Video Experience

Now to configure the Lync Server topology with new server role. open the topology builder and save a copy of the topology as a backup

Capture10

 Navigate to the “Edge pools” and select to define a new Edge Pool

Capture11

This deployment is Single Edge server deployment. Select the Single computer pool and specify the server FQDN

Capture12

Select to enable Federation on port 5061 and leave the rest of the options as unchecked.

Capture13

Configure the public FQDN records for SIP, Web Conferencing and A/V. leave the default port configuration as it is.

Capture14

Configure the Internal IP address. this is the IP address that configured in the internal Interface

Capture15

Configure External IP addresses. these are the IP addresses that configured in the external interface. this can be natted IP addresses from Firewall.

Capture16

Select the next hop to the Edge server. in this scenario, it’s the Front End Server

Capture 17

Associate the Front End pool to the Edge Server

Capture18

Now, Publish the topology and jump in to the Front End server

Capture19

Since the Edge server is not joined to the domain, it cannot retrieve the Central Management Store automatically. Export the Configuration store from the Front End server as shown below.

export-csconfiguration “c:\config\config.zip”

Capture9

Copy the “config.zip” file from Front End server to the Edge Server. Run the Lync Server 2010 installation media and install the core components. run the deployment wizard and select to Add or Remove Lync Server Components

Capture20

Select to install the Local Configuration store. Specify the config.zip file to get the configuration information and complete the step

Capture21

Now, go to the next step to Configure Lync server components

Capture23

Complete the step. All checks looks green and ready to move ahead.

Capture24

Now to assign certificates. request the internal certificate first

Capture25

Since the server’s not join in to the Domain, the certificate request has to be done manually. select to prepare the request now, but send it later

Capture26

Specify a friendly name and Mark the certificate as Exportable. notice the SAN records. it’s normal that media.domain.com record doesn’t include as a SAN record.

Capture28

Select the SIP domain and save the request as a local file.

Capture32

Make sure to import the Internal Root CA’s self sign certificate in to the Trusted Root Certification Authorities container. else the communication between the Edge server and the Lync Server will fail.

Capture30

Request a WEB SERVER certificate from the internal CA based on the request file. Import the certificate in to Personal certificate container and go back in to Certificate configuration wizard. select to assign certificate and select the newly imported certificate. assign in to the internal interface

Capture33

Now go through the same steps for the External certificate. request this certificate from public certification Authority. Import the certificate in to personal certificate store and assign the certificate in to external interface

Capture36

Certificate assignment is completed.

Capture37

Now, start the services and check on Windows services whether all the Lync Server related services are started.

Capture39

Enable External user access from the lync Server control panel External Access policy.

Capture41

Now clients should be able to login from the internet.

Step by Step Guide to Deploy Microsoft lync Server 2010


Microsoft Lync Server 2010 came in to UC domain while ago and it’s here to stay. Lync Server platform is far better than it’s predecessor Office Communicator 2007\R2 which including interoperability with various IPPBX platforms and VOIP Gateways.

One of the great features that came up with Lync Server 2010 is the SBA (Survivable Branch Appliance) and SBS (Survivable Branch Server) which add the surviveability to small branch offices when the connectivity to the central server is offline. I will cover this component in different post.

and the licensing changes introduced with the new platform makes it more affordable for the SMB market and given the ability to compete with high end IPPBX s such as CISCO Call Manager and AVAYA Platforms.

This article describe how to deploy Microsoft lync Server 2010 from the scratch to a successful client log in. Let’s devide the whole deployment process in to 3 steps.

1. AD\Domain infrastructure preparation

2. Applications Server preparation

3. Deployment of Lync Server 2010 software

Let’s start with Step 1

AD\Domain infrastructure preparation

Before getting in to deployment, it’s impotent to check the health of all the domain controllers within the domain. It’s a must that Domain controllers replication are healthy and no errors in the process. If there’s any problem found, those problems need to be fixed before the deployment. Also the domain and forest functional levels of the domain controller should be at least Server 2003.

Another important part of this deployment is the Enterprise Root Certification Authority Server. This CA will provide certificates to Lync Server role services as all communication between server roles are encrypted.

check http://technet.microsoft.com/en-us/library/gg412986.aspx for detailed information regarding the infrastructure requirement.

when ready, create 4 new DNS A records as shown below against the IP address of the Lync Server Front End Server.

  • sip.uctest.com
  • dialin.uctest.com
  • meet.uctest.com

Capture1

Create a DNS SRV record as below to get clients to automatically discover the Lync Server

  • _sipinternaltls._tcp.uctest.com:5061

 Capture2

As a Best Practice, it’s always good to use a Service Account to deploy the application. In this scenario, i’ll use a user account called “SvcLync”. It’s a must that this user account has to be in Domain Admin, Schema Admin and Enterprise Admin security groups.

Now the infrastructure is ready for Lync Server. Let’s Prepare the Application server for Lync Server 2010 Standard Edition Front End Server

Application Server Preparation

 The Server OS that i used for this deployment is Windows Server 2008 R2 X64 with SP1. Keep in mind that Lync Server only support x64 Operating Systems only. It’s recommended the server to be patched to the latest patch that available along side with the Service Pack. You can find the detailed hardware requirement in http://technet.microsoft.com/en-us/library/gg398835.aspx.

If it’s a production set-up, it’s recommended to use the Lync Server 2010 Planning tool to plan the complete deployment. you can download the planning tool from http://www.microsoft.com/en-au/download/details.aspx?id=19711

Login to the server using the Service Account and install Prerequisites to the Front End server. Run the below command in Powershell as the Administrator.

Import-Module ServerManager

Add-WindowsFeature NET-Framework,RSAT-ADDS,Telnet-Client,Web-Server,Web-Static-Content,Web-Default-Doc,Web-Http-Errors,Web-Http-Redirect,Web-Asp-Net,Web-Net-Ext,Web-ISAPI-Ext,Web-ISAPI-Filter,Web-Http-Logging,Web-Log-Libraries,Web-Http-Tracing,Web-Windows-Auth,Web-Client-Auth,Web-Filtering,Web-Stat-Compression,Web-Mgmt-Console,Web-Scripting-Tools -Restart

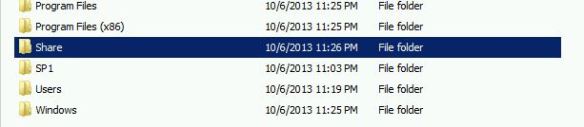
Create a folder called “Share” and assign read and write permission for “Everyone”

capture4

Restart the server when prompted. After the server comes up again, Add the service account to the local administrators group in Front End Server. Now we are good to go with Lync Server deployment

Deployment of Lync Server 2010 Software

Now load the Lync Server media and run the installation file. Select to Install it prompted to install VC++.

Capture5

Open up the Deployment Wizard and let’s start with the Active Directory Preparation step. At this point, it’s very important to verify that the AD replication is healthy. Else some components of this step will fail

Capture6

select to prepare the Active Directory

Capture7

Schema Prep has completed Successfully.

Capture8

notice the Green check mark next to the Schema Preparation Step indicating that the step completed successfully

Capture10

Now Prepare the Forest. Select the Prepare Current Forest step

Capture11

At this point you need to specify what forest that need to be prepared. This step has to run for all the domains that available if those domains are used in Lync Server platform. in this scenario, I’m selecting local domain as there’s no other domain available in this set-up

Capture12

Proceed with the Preparation and finish the step.

Capture13

Both the Schema preparation and Forest Preparation are successfully completed. Give it some time replicate the attributes across the forest

Capture15

Now to prepare the Domain. Select the Domain preparation step

Capture16

Completion of this step is depending on the AD replication process. If all is well, this step will complete successfully

Capture17

The AD Preparation is successfully completed. All checks are green

Capture19

Now go back and install the Topology Builder. Unlike OCS, Topology builder is the centralized tool that used in Lync server deployment to specify server roles and FQDNS for the rest of the deployment.

Capture20

Now to deploy the 1st Standard Edition Server. This step is important as the 1st Standard Edition server keeps the Central Management Data store. there can be many Front End servers but the CMS will always be in 1st Standard Edition FE server

Capture21

Proceed with the installation and complete the step. All checks are green and good to go ahead

Capture24

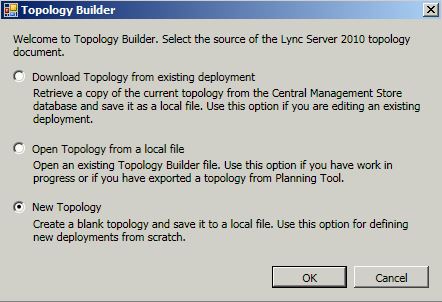
Now, let’s go back to the Topology. Open up the topology builder and select to deploy a New Topology

Capture25

Save the topology and specify the primary SIP domain. This is the Primary SIP domain. there can be many additional SIP domain and can be added any time even after the deployment

Capture26

This is where to configure all the additional SIP Domains that are available. I’m leaving as blank as there’s no additional SIP domains to configure

Capture27

Now to define the Front End server pool.

Capture28

Define the FQDN of the Front End server and select to deploy the Standard Edition Server. Make sure that you get the above FQDN right. If you get this one wrong, you’ll be end up cleaning AD objects using ADSIEDIT.

Capture29

Now configure the services that goes in to the Front End Server. I’m selecting all services for this deployment

Capture30

No select what are the server roles that can be collocated in to same box. A\V conferencing server will get collocated by default in to Standard Edition FE server but it can be deployed i a separate box in Enterprise Edition. mediation Server can be scattered or collocated regardless of the Lync Server version

Capture31

Select what are the other server roles that are going to be deployed. I’m not going to deploy any other roles and leaving it black. Will cover deployment of these roles in up coming posts

Capture 32

Now define the File Share store. This is the share folder that I created while ago. this share folder will host Address Book files, UC Phone Updates and meeting contents.

Capture32

Configure the External Web Services URL. There have to be an A record created in Public DNS for this host name and This URL need to be published in TMG and reverse proxy in to Front End server.

Capture33

Complete the rest of the steps. go back to the Standard Edition server in the topology and edit properties. specify the CMS Server and the admin URL

Capture34

All looks good. now publish the topology

Capture36

Topology published successfully. now to install the services in Front End server. to do that, run the deployment wizard again and select “Add remove Lync Server Components”

Capture40

Step 1, Install the Local configuration Store. before getting in to this, the service account need to be added in to CSAdministrator and RTCUniversalServerAdmins security groups. if not, this step will be likely to fail. once ready, run the step. select to retrieve the CMS directly.

Capture41

Local Configuration Store deployment successfully completed. all checks green

Capture43

Now to Step 2. Setup or Remove Lync Server Components. Run the step and reboot the server when prompted.

Capture44

Run the step after rebooting the server. The step will complete successfully.

Capture45

Step is completed and checked green

Capture46

Step 3. request and install certificate. select the default certificate and request.

Capture47

Request the certificate immediately from the internal Root CA

Capture48

 Select the root CA and specify a friendly name for the certificate. select the certificate as Private key exportable

Capture50

Select the SIP domains that included in to this certificate. make sure that the check box for relevant domains are checked

Capture52

Once requested, assign the certificate in to Front End services. All good and green.

Capture54

Step 4. Start the services. Select to start the service and go in to Windows servers and verify that all the Lync Server services are started

Capture56

The deployment is completed. now to test a user login. enable a user for Lync Server

Capture57

Login to the client using the user credentials. Clint signed in successfully.

Capture58