End of Life for Lync Phone Edition (LPE) devices.


With the recent BEAST and POODLE attacks and having to support weak cryptography, Transport Layer Security (TLS) versions 1.0 and 1.0 are soon to be depicted and calling as End of Life and support from most of web based platforms within this year.

This will not going to be a major issue for most new platforms as they use “Modern” TLS protocol version 1.2. Once of those platforms that re deprecating older TLS versions are Microsoft 365.

Microsoft have announced deprecation of TLS 1.0 and 1.1 by 31st of October 2018. After that, anything connects to Microsoft 365 that only use TLS 1.0 and 1.1, will seize to function.

What’s that got to do with LPE devices?

Unfortunately, LPE devices only understands TLS 1.0 and nothing else. With the deprecation of older TLS versions from Microsoft 365, the organizations that use LPE devices with Skype for Business Online (SfBO) will eventually stop registering users in. This will be a major problem organizations and individuals who fell in love with those devices.

What classifies as LPE devices?

There are 2 versions of devices that can be used with Microsoft Lync\Skype for Business platforms.

  • Optimized devices
  • Certified devices

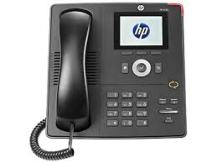
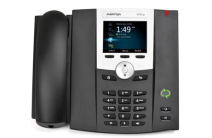
Ones that are called “Optimized” are the devices that contains Microsoft built firmware version. These devises also called Lync Phone Edition or LPE devices. Microsoft manage the operating system (Windows CE 6.0) goes in to these devices, even though it get built by 3rd party vendors. Classic examples of these are Polycom CX series, HP 41xx series and Aastra 672x series

Drawing1

imagesimage_thumb

On the other hand, the “Certified” ones are the devices that are built and supported by the 3rd party vendors them selves. In other words, they build the device and build the firmware that goes in to them. Since Microsoft have decided to deprecate old TLS versions, they will most probably not release a firmware update to these devices to allow TLS 1.2.

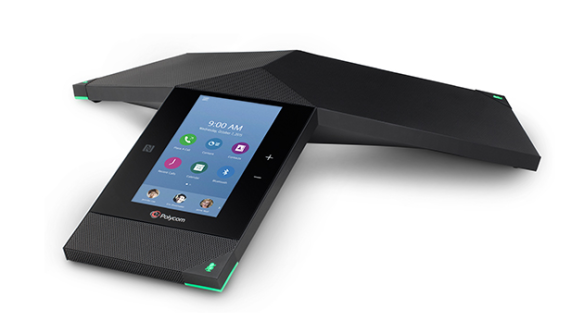
Not every device out here get endorsed as Microsoft Certified Device. These vendors\devices need to go through a certification process (3PIP) at Microsoft, which allows the devices to be certified to function with Microsoft Lync\Skype for Business platforms. So far, there is Polycom VVX series devices, Yealink, AudioCodes and Spectralink devices that carries the “Certified” banner. Certification information for these devices can be found here

What should i do?

Assuming that Microsoft will not come up with an update for their Windows CE 6.0 platform, you should think about replacing all LPE device with any of Certified devices. You can select any of devices that i mention above as a replacement for current LPE device. They are packed with features and more “configurable” than the LPE device.

I only have an on-premises deployment. Will this effect me?

Not really. TLS version control of on-premises server are up to local administrators to manage. As long as TLS 1.0 and 1.1 is not been disabled from Lync\Skype for Business Front End servers, the LPE devices will continue to work.

But, having those old TLS versioned enabled in servers are making them vulnerable to attacks. Also, Microsoft will not be releasing any new firmware updates for these devices and they will eventually be unsupported and end-of-life. It’s your best interest to get rid of these devices and replace with newer Certified devices.

There are some vendors like AudioCodes and Yealink have started to provides LPE replacement offers for organizations that has large number of LPE devices. It is a good opportunity to grab one of these offers and replace the old LPE fleet of devices.

I hope the message is clear, 31st October is the cutoff date to replace all LPE devices that are used with Skype for Business Online. Look for replacement and get it done soon. Clock is ticking 🙂


Configure Group Pickup in Skype for Business and Assign a “Pickup” Feature Key to Polycom VVX


When replacing a traditional TDM PBX with Skype for Business, one of the most common feature that users requests is, the group call pickup. In Microsoft Unified Communications platform, group call pickup was introduced in early Lync Server 2013 days. It was configured initially by using the Secondary Feature Activation Utility or (SEFA Util). SEFA Util was an add-on tool that needed to be configured on top of Lync server platform. Managing group pickup using the tool was not so user friendly.

In Skype for Business, Group pickup was included in to the existing Call Park feature. The pickup number for a group will be created as a one of the numbers that belongs to a parking orbit.

Below command need to be run on Skype for Business Front End server to configure a call park orbit, to be used for Pickup groups.

New CsCallParkOrbit -Identity “Call Pickup” -NumberRangeStart *200 -NumberRangeEnd *299 -CallParkService “Service: ApplicationServer:FEPOOL01.contoso.com” -Type GroupPickup

To assign users to a group, run the command;

New-CsGroupPickupUserOrbit -User sip:user1@contoso.com -Orbit “*200”
New-CsGroupPickupUserOrbit -User sip:user2@contoso.com -Orbit “*200”

Above user can now be able to pick each others calls by dialing *200 from Skype for Business client or IP Phone.

Looking at a soft key configuration within a Polycom VVX, it would require a Provisioning Server to manipulate the device configuration. Sometimes back, i wrote an article about setting up a Provisioning server for VVX. The same process can be used to configure soft keys for devices.

In the existing features.cfg configuration file, enable the EnhancedFeatureKeys option

In SoftKeys, configure either the Softkey.1 or Softkey.2 options. In my case, the Softkey.1 was used for some other feature. Configure the key as shown below in snapshot. 

Once it’s configured, the “Pickup” key will appear in Soft Key 1 position of the device. Once pressed, it will call *200, which is the ID to pickup calls. If this device\user is belongs to a pickup group and assign with *200 ID, then the device can pick calls that are meant for others within the group.

The downside of the configuration is that, Provisioning server will push the same ID to all devices and all devices might not belongs to the same pickup group. The way around is to have unique configuration files based on the MAC address of the device, instead f using 000000000000.cfg file. This will allow the devices to have different configuration file. But, it becomes difficult when there are lot of endpoints and lot of groups. This will work very well for a small scale deployment. Try it out and post and comments or issues below. Thanks.

Updating firmware of Polycom Trio 8800 using Provisioning Server


RealPresence Trio 8800 device is becoming one the most popular choice of conference room device that came from Polycom. Under it’s pretty looking skin and 5″ LED colour display, it has Polycom VVX firmware running on it. Which means that it can be managed via the Provisioning Server.

Capture.PNG

Thinking of Firmware upgrade for the device, there are several ways to skin the cat. If the device is meant to work with Skype for Business Server platform, then the Skype for Business device update service can be utilise to upgrade the firmware of the device.

If the requirement is to update a standalone device, the it can be upgraded by using a USB stick that have required files copied to it. Jeff Schertz have written a nice blog post covering this method.

The method that i’m going to  explain here is to leverage Provisioning server to update the firmware of the device. Most of VVX deployments would have a local Provisioning server deployed to support the device fleet and same server can be used to push the firmware to Trio 8800 as well.

Latest firmware version that’s available as of 25/05/2016 can be downloaded from here. Upon downloading the .zip file. Extract and copy the 3111-65290-001.sip.ld file in to the root folder of the Provisioning Server.

Capture

Open the 000000000000.cfg file using XMLNotepad and include the new .ld file in to the APP_FILE_PATH.

Capture

Reboot the device. It should be able to fetch the .ld file and update the running firmware version. You can verify the current running firmware version from either logging in to the device web portal or navigating though the Settings>Status menu of the device. Hope it’s helpful and happy updating.

Optimizing VVX deployment with pre configured configuration files.


While ago I posted an article explaining how to use the configuration files to deploy and configure VVX devices over a provisioning server. If anyone who used the .cfg files on the provisioning server might realize that, there are lot of parameters to be configured so the the device deployment can be streamlined and make it more user friendly in the process.

In this article, I have shared a set of pre configured ans optimized .cfg files that can be used with any Lync server deployment. Granted that some of the parameters need to be changed according to the environment and I will explain what need to be changed and why.

There are 6 configurations files all together which address different segment of the device configuration.

Starting with Device.cfg. This configuration file set to configure following parameters in VVX device,

  • Set Device Base Profile as Lync
  • Change default administrator password (In version 5.1.1 Revision B, Device comes up with warning message if the Administrator password remains as default)
  • Enable Device update
  • Specify device update location
  • Time server configuration

The Feature.cfg file specify the common set of features on the device such as, Call lists, Miss call alerts, Contact Directory. In this file, the specified parameters are below,

  • Removed the “Corporate Directory” option on the device. Within “Directory”, the device will have “Lync Directory” option so that the contacts can be searched and called. In many cases, I have seen users get confused with two different set of directory options hence removing the “Corporate Directory” option
  • URI Dialling disabled. VVX generally have URI dialling enabled. When this feature is enabled, all inbound and outbound calls display as the full SIP URI (sip:+6123456789@contoso.com.au). Users who are used to have legacy PBX end points does not like this at all. They want to see just the number or the name without any other information

Sip-Interop.cfg is the most important one. This one controls the device registry intervals as well as the SIP Proxy server related parameters. In this configuration file, most of the parameters haven’t changed. But, the ones that were changed are below,

  • Device registration expiry interval. Default device registration expiry interval is 3600 seconds. If the devices is registered in an SBA, then if the SBA goes down, the devices still shows as signed in but, it actually be in an unknown condition till the registration expires. Have 3600 seconds is too much in that scenario. In this configuration file, the interval has changed to 120 seconds. This cannot be less than that. If it’s less, then users will experience the frequent device sign in and sign out.
  •   VOIP Server configuration. Here, the VOIP server interoperability is set to Lync 2010 and the transport method is set to TLS.
  • SDP early media disabled. I have noticed when this parameter is enabled, device sometimes does not provide a ringing tone to the end user. The dialled call will be blank till it get picks up.
  • Apply Digitmap Locally. Enabling this parameter will make the device to adhere to the Lync server normalization rules which are assigned to the user.

The Site.cfg file is configured to set daylight saving time in to the device. If the daylight saving is applicable, the start and stop times need to be configured,

  • SNTP address of the time Server
  • Daylight saving enable or disable. If enabled, start and stop times

Lync.cfg file configured to set BToE enabled. But, in version 5.1.1 Revision B, Polycom have set the BToE as disabled and given that the configuration file version is 5.2, this configuration file doesn’t really enable BToE on version 5.1.1 Revision B firmware. But, it can be used on Version 5.2.

The Cer.cfg is set to import the root CA in to the device. 90% of the devices that I have deployed were able to get the certificate without uploading manually. In case the device fail to pick up the certificate, copy and paste the hash file of the CA certificate in to the configuration parameter.

Finally, the Master configuration file 000000000000.cfg. All the above mentioned configuration files are specified in this master configuration file. When the device boots up, it will fetch the configuration mentioned on this files and get configured based on parameters which are configured on each sub configuration file.

The configuration files can be downloaded from, https://onedrive.live.com/redir?resid=6329AF91D1E5ADBC%21704

Follow my other article if you are new to the VVX setup. https://thamaraw.com/2014/04/02/configuring-the-provision-server-to-setup-polycom-vvx-devices-to-support-lync/

Configuring the Provision Server to setup Polycom VVX devices to support Lync


Recently i got the opportunity to deal with Polycom VVX devices that need to be configured to work with Lync Server 2013. My first experience, I’ve noticed that the VVX devises are not really ready to be signed in with a Lync user account right out of the box. In fact, there were several tings that need to be addressed before the devices putting in to production. This includes,

  • Devices comes up with “Generic” profile other than “Lync” profile.
  • Dialed numbers and inbound CLI presentation shows up as the full SIP URI (sip:+61234567898@uctest.com)
  • In the Directory, there are two different directories, “Contact Directory” and  “Lync Directory” which can be confusing

All those issues that i mentioned above can be addressed by using a Provisioning server. Provisioning will centrally control all devices and keep the configuration identical on all VVX devices that are running. I’m not going to cover the steps to deploy the Provisioning Server in this thread. Jeff Schertz has written a nice article explaining how to deploy the provisioning server (http://blog.schertz.name/2013/05/provisioning-polycom-sip-phones/). To get started with the issue #1, The devices need to be configured so that when they plug in to the network, it has to come up with the “Pin Authentication” option so that a user can sign in using the extension and PIN Number. to do this, I’ve used the device.cfg file that comes with the Firmware bundleCapture

open up the device.cfg file using XML Editor and set the parameters as mentioned in below snapshot. device cfg

Save the configuration and copy the .cfg file from  “Configuration” folder to the FTP Root directoryFolder

then, open up the 00000000000.cfg file from XML Editor and set the CONFIG_FILES as mentioned in snapshot below. maser cfg file config

After that, reset the device to factory (so that it will revert the base profile configuration). When it boots up, it should come up with the Lync profile and ask to enter the phone number and the PIN.

And moving back to the issue #2, Most of the time the end users are willing to put up with this as they can actually see the “Number” showing up on the display and don’t really care that it’s in wired format. But if it’s a migration from a traditional PBX, users will notice this immediately and ask to fix it.

This is a feature that comes with the VVX device call “SIP URI Dialing” when it turned on, the inbound calls will looks like below,  

And the issue #3, This might not be an “Issue” but a preference for most of the users. The “Contact Directory” is there so that the end users can specify numbers locally on the device. but in lync, users can have local contacts maintain on Outlook and get Lync to dial out and this makes “Contact Directory” redundant.photo

To fix both of this “Issues”, i used the Features.cfg file form the “Config” folder. Open the file with XML Editor and set the parameters as mentioned in below snapshot. Delete the rest of the parameters from the file as they are not in use.Features cfg   Move the .cfg file in to the FTP root. Open up the Master configuration file (0000000000.cfg) and set the CONFIG_FILES as mentioned below in snapshot.maser cfg file config

Restart the device and go to the “Menu”. Select Settings>Status>Phone>xxxx and check if the configuration files are populated.

Make several test calls and see if the number presentation shows properly with just the Number and not the URI bits.

And check the “Directory” and verify that the “Contact Directory” is no longer there and only the “Lync Directory”, “Contacts” and “Recent Calls” are there.photo3

That’s about it. Good luck setting up the Provisioning server and post below, if there are any issues. Thanks.


Configure Polycom VVX series phones to work with Lync Server 2013


Polycom has now made the VVX series phones as Lync Server Compatible. The latest firmware version 5.0.1 Supports more Lync features such as PIN Authentication and update the device using Lync Server device update platform like the rest of the CX series.

Polycom has introduced the new BToE (Better Together over Ethernet) application to support VVX series to integrate tightly with the Lync Client. The user experience of this is same as the CX Series tether via the USB cable but in this case, it use the Ethernet connection.

This article highlights the standard deployment process of a VVX Series phone and sign in to the device using Lync Enterprise Voice enabled account.

I’m using a VVX 500 phone for this. Then the device first plugged in to the PoE connection, It comes up with the generic ProfileIMG_0472

Get the device’s IP Address from the display menu. Unlike the CX series, VVX can be configured with both manual IP configuration and DHCP. Connect to the device’s main web page using IE. 

The standard Admin password for VVX Series is 456 and the user password is 123. Login as an Admin.

In Home page, it’ll show you what is the current Firmware configured and information such as the IP and the MAC ID.Capture1

If the current configured Firmware is not 5.0.xx, then go to “Utilities” and select “Software Upgrades”.To upgrade the Firmware, verify that the device has access to the Internet and “Check for Updates”Capture4

Once the Firmware is sorted, navigate in to “Simple Setup”. Set the correct time Zone and select the Base Profile as “Lync”. The device will restart upon confirmation.Capture3

Once the device comes up, navigate to the “Features” using the Menu and notice that two new options appeared. This would be “Microsoft Lync” and “BTOE”IMG_0473

In “Microsoft Lync” option, there will be two sign in methods. the “User Credentials” and “PIN Authentication”.IMG_0474

As usual, to use the PIN Authentication, the DHCP Options must be configured in DHCP server (Option 43 and 120). You can use any EV enabled account with the Extension and the PIN to sign in to the device like the CX series.IMG_0475

In “User Credentials”, you can use the Lync Sign In address and domain login credentials to sign in to the device. The on screen keyboard isIMG_0476

Now to play around with the BToE application. Download and install the Polycom BToE application from http://support.polycom.com/PolycomService/support/us/support/eula/ucs/UCagreement_BToE.html and install.BTOE2

Connect the PC’s Ethernet cable to the device’s PC port and run the BToE applicationBTOE

Verify that the BToE is enabled on devices using the menu. By default it’s enabled. If that’s the case, then it’ll show in the task bar as “BToE Activated” Capture7

Just like when you Tether a CX series using USB, a log in menu will come up to sign in to the device.Enter sign in credentials and sign in to the device. Capture6

The BToE status will now change from “Activated” to “Paired”. At this point, you can make calls from Lync Client and the device will dial the call out. Capture5

Notice that the green icon on top right side of the display indicating the paring status.IMG_0478

The sign in process is successfully completed and no alerts coming up. Still the Exchange integration need to be configured.IMG_0479

Unlike the CX Series, the VVX series does not automatically detect the EWS URL to connect to Exchange Server. this configuration has to be manually configured.

Go back to the admin page of the device and select “Settings”, In Settings, drop down the “Exchange Application” configuration. populate the Exchange Server URL with the EWS URL. This should be https://autodiscover.domain.com/ews/exchange.asmx.

Enable the “Exchange Calendar” and apply the configuration change. The device will restart upon confirmation.Capture9

A basic troubleshooting can be done on the device using “Diagnostics” Logs. It’s not much but can get an idea of what might be going on in there.Capture10

Overall, the VVX Series is way better and more feature rich compared to CX Series. But it has it’s own downfalls. One would be manual configuration of EWS which i feel will not be feasible in mass deployments.

How to update Firmware for Polycom Lync Phone Edition Devices


Configuration of Device Updates for Lync Server 2010 and 2013 is pretty much straight forward. Device Updates are controlled by the Front End server web services and it use the Lync File Share to distribute the firmware update files.

The Lync File Share has to be configured with read/write access to everyone so that the devices can fetch the device update files and put log files in to the Device Logs folder.

To start the process, download the device update file from Microsoft site. once downloaded, run the UCUpdates.exe file

1

Specify a location to extract the cabinet file which contains the update bits. click on Next to proceed with the installation.2

Navigate in to the given folder and notice that the ucupdates.cab file is saved in the folder3

 Run the command,

 Import-CsDeviceUpdate -Identity service:WebServer:lyncpool.contoso.com -FileName C:\Soft\UCUpdates.cab

To import the update files in to the Lync Server 2013 web server platform and go in to the Lync Server Control Panel and check the Device Updated in Clients tab. there should be bunch of update files appeared for Polycom CX series devices.5

Go in to the Lync Share and navigate in to the 1-WebService-1\DeviceUpdateStore and verify that the device updates files are populated in respective folders and ready to be picked up by the devices.7

Configure a test device to test the update and to verify everything’s in order before updating the rest of the phones. go in to the “Test Device” tab and configure the MAC ID of the device6

Once committed, It’ll take up to 10 minutes for the device to pick up the update or a reboot of the device will instantly pick up the update file. do not try to use the device while the update is taking place.

The device will stop responding for a while and re boot upon the completion of the update.

DHCP Options Configuration for Aries Family IP Phones


Microsoft Certified IP Phones (Aries family Phone) are the certifies and optimized devices that supports Microsoft Lync Server 2010\2013. There are tho methods that you can get these devices configured to work with Lync Server.

1. USB Tether with a Laptop or a Desktop PC

2. Login using a PIN and an Extension number

the 1st method is the recommended as it’s “Better Together” with the Lync client. Once connected over the USB, it’ll allow the phone to get calendar information from Outlook and display on phone and it allow the user to make and answer calls seamlessly between the PC client and the Phone.

But, there are situations that a Phone has to be deployed standalone without a PC (Conference Rooms, Common area). Situations like this, using a PIN to register the phone could be very useful. Below are the instructions to configure DHCP to get the phone registered by  using a PIN.

Before begin, copy the DHCPUtil.exe and DHCP Configscript.bat files to DHCP server. You can find them in C:\program Files\Common Files\Microsoft Lync Server 2010\2013

If it’s Lync Server 2013, you might need to install the VC++ on DHCP server. you can find this on installation media of Lync Server 2013.

As shown in below snapshot. Verify that the NTP server and Time Server options are configured in Scope Options and Server Options. Make sue that those options are configured with the IP address of the DHCP Server. Not the loop back IP address.

test1

test2Open the command prompt as an administrator. navigate to the folder that you saved the files copied from the Lync Server (DHCPUtil and DHCP ConfigScript). run the command,

DHCPUtil.exe -sipserver <FQDN of the lync FE Server> -webserver <FQDN of the lync FE Server> -DHCP ConfigScript

This command will configure Option 120 and Option 43 in DHCP server.

test4Open the DHCP management console and look in the server Options and Scope Options for the new Options. Note that it might take sometime to appear depending on the performance of the Server.

test5test6

In Lync Server, The Line URI for the user should be configured as tel:+6145678;ext=5678. This will specify the “extension” value and in the registering process, this Extention value will be used against the PIN.