Fix External Call Transfer in Direct Routing with Microsoft Teams – AudioCodes Mediant SBC with SIP Trunk


In my previous post, i have described what the root cause to make external call transfers and forward fail, in Direct Routing with Teams. In that article, i have explained how to fix call forwarding by setting up manipulation rules in AudioCodes Mediant SBC.

In this post, i’m going to explain how to fix call transfer function. As the same way i fixed the call forwarding, i will use message manipulation here as well. But, i will be using a different SIP header, instead of  Call History.

If you are familiar with Skype for Business or Lync, you would know that they both use REFER to handle call transfers. Teams is exactly the same. It use REFER for call transfers. But unfortunately, most of the SIP Trunk providers does not support this function. So, we either disable REFER in on-premises Skype for Business\Lync servers, or set the SBC to take care of it locally.

But, in Teams environment, you can’t disable REFER. The Trunk configuration does not have any such parameter to alter. So instead, we set the SBC to handle REFER locally. I don’t cover that configuration here. I have already mentioned that in my previous article that explains how to configure Direct Routing with Teams, using AudioCodes SBC.

So to fix Transfer, i use REFER related headers in SBC. Idea is to manipulate the FROM User header, replace with SIP Trunk Pilot DID, if the session referred-by header contains sip.pstnhub.microaoft.com. This way, the rule will only allow to externally transferred calls.capture

After configuring this, the Manipulation Set ID must be assigned to the Outbound Message Manipulation setting of the IP group of the SIP Trunk. capture1

Once this is done, the call transfer to PSTN destinations should work. In my test call below, i’m making a call from +61451xxxxxx, to my DID +61249xxxxxx and transfer to +61131313. Capture2.JPG

As expected, the call get accepted by the SIP Trunk and connected with +61131313.The Source DID of the call was manipulated to the Pilot number of the Trunk.capture3

That fixed the external transfer issue for me.

If you still having issues with PSTN Transfer, check the SYSLOG of a failed calls to identify what could be the root cause. Post in comments if you still have issues with PSTN call transfer setup in Teams (with Direct Routing).

Fix External Call forwarding in Direct Routing with Microsoft Teams – AudioCodes Mediant SBC with SIP Trunk


When Direct Routing with Microsoft Teams has been deployed, you will notice that forwarding and transferring calls to PSTN numbers might not work. But, if the PSTN connection is an ISDN trunk or anything TDM, this will work from the get-go.

The reason behind this is, both Skype for Business and Teams sends original caller ID, when a call get forwarded or transferred to PSTN. The original caller ID will be the CLID of the PSTN inbound call. If the PSTN connection is a SIP Trunk, then the trunk won’t allow outbound calls from a source number that does not belongs to it’s number range. It will reject the call.

Below is a SYSLOG capture of a call that getting forwarded to PSTN. Notice the FROM field. That is a Mobile number. HISTORY INFO carries the DID that forwarded the call.

If the PSTN connection is a TDM trunk, then it will mask the caller ID to the pilot number of the trunk and process the call. In this article, i’m going to explain how to fix PSTN call forwarding to work with SIP Trunks.

In my setup, i have Direct Routing configured in AudioCodes Mediant 800 SBC. I have a SIP Trunk from a local telecommunications provider for PSTN connectivity. So, let’s start.

1st thing you need to do is, enable “ForwardCallHistory” in OnlinePSTN Gateway. Log in to Skype for Business Online Powershell and run the command. By default, it turned off;

Set-CsOnlinePSTNGateway -Identity <FQDN of the GW> -ForwardCallHistory $True

Log in to AudioCodes SBC and create a Message Manipulation rule to manipulate the FROM User URI to replace it with the Pilot number of the SIP trunk. Unfortunately, we can’t get the actual DID number that sets the call forward as that information is not there in INVITE header. The Manipulation Set ID mentioned below can be any value. I had to use “5” as i’m already using 1-4 for different rules. Action Value should be the Pilot number of the Trunk. 

After that, set the Manipulation set ID in Teams IP group, “Inbound Message Manipulation” setting.

This should fix the number inbound number presentation in to SIP Trunk. If you look at a SYSLOG capture,it will show how the numbers are getting presented to SIP trunk. Notice that the FROM number have changed from +614xxxxxxxxx mobile number to 089xxxxxxx value, that was set in Message Manipulation. This number was manipulated to remove “+61” and add “0” by an “Outbound Message Manipulation” rule. 

By now, call forwarding to PSTN should work. If it still having issues, check the SYSLOG of a failed calls to identify what could be the root cause. Post in comments if you still have issues with PSTN call forwarding setup in Teams (with Direct Routing).

Using On-Premises PSTN numbers for Call Queues and Auto Attendant for Cloud Connector Edition


If you are using Microsoft Phone system in O365, you might already be using Call Queues and Auto Attendant features. For those who haven’t use them yet (you might be still using Skype for Business Server on-premises), Call Queues are the equivalent of Response Group Services Hunt Groups. Auto Attendant is the online version of Response Groups IVR. This also replaces the Auto Attendant feature in Exchange UM.

If you are using on-premises Skype for Business server and thinking about moving to Skype for Business online (which you should), and want to use the same PSTN numbers that you use in on-premises server for hunt groups, then this explains how you can do that.

Typically, Call Queues and Auto Attendant services needs a “Service Number” that acquired from Microsoft to be associated with these services. This is fine if the deployment is a “green field” deployment and no numbers have been published outside. But, using services numbers will be challenging when moving on on-premises platform to Teams or SfBO as already published numbers need to be changed.

In this article, i’m going to explain how you could retain the existing published hunt group numbers and move to SfBO, using Cloud Connector Edition. This article only applies to;

  • Cloud Connector Edition deployments for Skype for Business Online (SfBO)
  • AudioCodes Mediant SBC in use for PSTN integration.

**This article does not applies to Direct Routing with Microsoft Teams.

First, let’s create the Call Queue in Skype for Business Admin Portal. Log in to O365 portal and navigate in to Teams\Skype for Business Admin Portal.

Then select the “Legacy Portal” option (Enterprise Voice related components have not yet migrated in to the new Admin portal). In Legacy Portal, go to “Call Routing” section. 

Click on “Add New” to create the new Call Queue. Set a name for the Call Queue and select the domain. Note down the domain that you have used as it will be required later on. Set the call distribution method the way you want and the AD group that contain the users who will be participating in the queue. Save the configuration when done.

Once the object is created, note down the user part of the SIP URI of the object. We will be using this in AudioCodes gateway.

So the O365 bit is done. Now, log in to the AudioCodes SBC. In the SBC, on the IP Group that was created for SfBO, configure the domain that you have selected above, in to the “SIP Group Name” field. This is important as this domain name will override the host component of the INVITE request that goes in to SfBO. If the domain mentioned in here does not match up with the domain that was selected in Call Queue, the the call will fail to connect.

Next s to confirm that the call routing is in place. In the SBC, there should be a route configured to send calls to SfBO. If it is a standard Direct Routing or CCE deployment, the there should be a route configured to send all calls to O365. Below snapshot shows a rote entry that configured to send all calls from SIP Trunk to be sent to SfBO. The numbers are already in E.164 format. Otherwise, you will need to normalize it to convert to E.164.

The last component is to configure a manipulation rule to convert the published phone number, in to the user component of the Call Queue URI. Below snapshot show the on-premises PSTN number +61893231234 convert to hg_dd72839366d64b58b44775ab76428578

The configuration is completed now. When anyone outside calls the number +61893231234, the call will land on the Call queue. There were no Service number used for this configuration.

Direct Routing Configuration With Microsoft Teams and AudioCodes Virtual SBC (Part 2)


In this article, i’m going to cover the configuration that involves in configuring the AudioCodes Mediant VE (Virtual Edition) with Microsoft Teams using Direct Routing. Let’s start with the required ingredient list;

  1. Certified SBC for Direct Routing. In my case, it’s AudioCodes Mediant VE, version 7.20A.156.028 (Newer Firmware versions will require dedicated Teams License in SBC)
  2. AudioCodes SBC and Teams licenses
  3. Public Certificate with a SAN record with the host name of the SBC (.pfx file).
  4. Public IP address
  5. Firewall Rules
  6. Public DNS Record

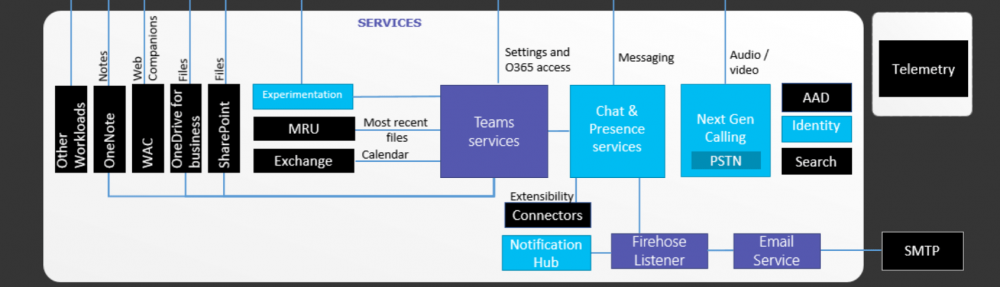
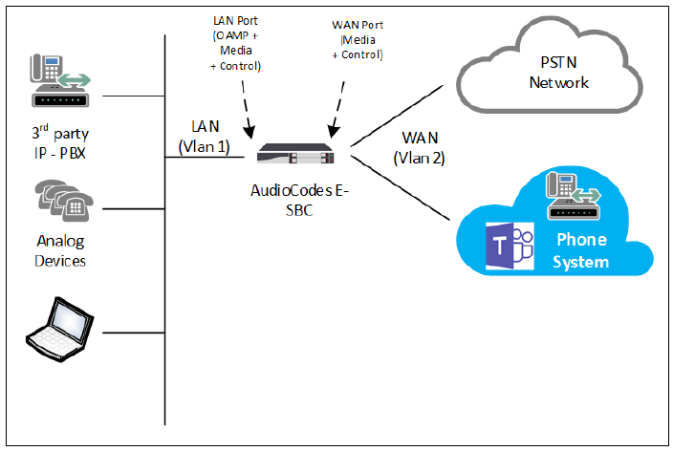
SBC Deployment Topology

Just to explain a bit about the supporting infrastructure for the SBC, specifically Network layer, the SBC is configured as a multi homed devise where one interface is in DMZ and the other interface is in LAN network. The reason for this setup is to secure the corporate network from potential threats from in the internet. As one of the Gateway interfaces will be opened to the internet, it’s recommended to follow this process.

SBC it self is a secured devise. So nothing other than allowed SIP traffic can be passed on to the corporate network.

Capture1

Public DNS and Firewall rules

A set of Firewall rules need to be defined, so that Teams SIP Proxy can communicate with the SBC. At Teams end, there are 3 Sip Proxies. Those are, sip.pstnhub.microsoft.com (Global FQDN), sip2.pstnhub.microsoft.com (Fail over FQDN), sip3.pstnhub.microsoft.com (Fail over FQDN). These DNS records resolve to below IP addresses;

  • 52.114.148.0
  • 52.114.132.46
  • 52.114.75.24
  • 52.114.76.76
  • 52.114.7.24
  • 52.114.14.70

The required firewall rules for SIP Signalling are below;

Traffic From To Source port Destination port
SIP/TLS SIP Proxy SBC 1024 – 65535 Defined on the SBC
SIP/TLS SBC SIP Proxy Defined on the SBC 5061

In this setup, we’ll be using the SBC Source port as port 5067.  Firewall rules that are required for Media are below;

Traffic From To Source port Destination port
UDP/SRTP Media Processor SBC 49152 – 53247 Defined on the SBC
UDP/SRTP SBC Media Processor Defined on the SBC 49152 – 53247

The Media port range that we’ll be using in the SBC will be the range 6000 – 6499. The IP rage within Teams that allocated for Media is;

  • 52.112.0.0 /14 (IP addresses from 52.112.0.1 to 52.115.255.254).

It also requires a public DNS record configured for the IP public address that is used for DMZ interface in SBC. The public IP address can be NAT to an internal DMZ IP or, the Public IP address can be directly configured on the SBC’s DMZ interface and configure the Firewall in DMZ to control traffic.

In this setup, as i have my SBC in Azure, in’m using a NATed public IP on my DMZ interface of the SBC. And i have a DNS record configured to resolve the host name sbc.uctechie.com, against that IP address.

SBC Network Configuration

AudioCodes Mediant VE is now available as an App to be deployed in Azure. If you log in to Azure portal, you can find the app and deploy it the way you want. In this setup, I’m using AudioCodes Mediant VE app in Azure. I’m not going to cover the steps for SBC provisioning in Azure in this article.

Let’s start with configuring the network component. The LAN adapter will be already configured and accessible by now. Configure the WAN interface with a DMZ IP address as shown below;

Capture7

The LAN interface must be configured to use OAMP+Media+Control applications, while the WAN interface should only do Media+Control. Both interfaces should be in dedicated VLANs. The network connectivity should looks like below;

Capture30

Next, move to configure DNS. I need to configure SRV record for Teams proxy as it uses multiple host names and IP addresses. Only way to handle this within the SBC, is to configure a SRV record and configure each proxy address within the SRV it self.  Navigate to Setup> IP Network> DNS > Internal SRV, and create a SRV record for teams.local as shown below;

Capture17

Configure Certificates

As Microsoft Teams will only use TLS and it’s connected over the Internet, a public certificate must be used in the SBC to establish TLS sessions. My public certificate contains a SAN record for the SBC;

Capture21

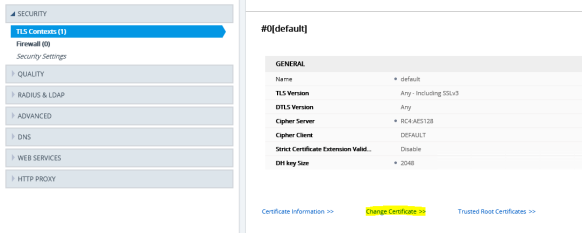
I will be using the above mentioned .pfx file of the public certificate here. Navigate to Setup> IP Network> Security> TLS Context, edit the default context entry and configure as mentioned below;

Capture2

Once the configuration have been saved, navigate to “Change Certificate” in the same window to upload the .pfx file.

Capture3

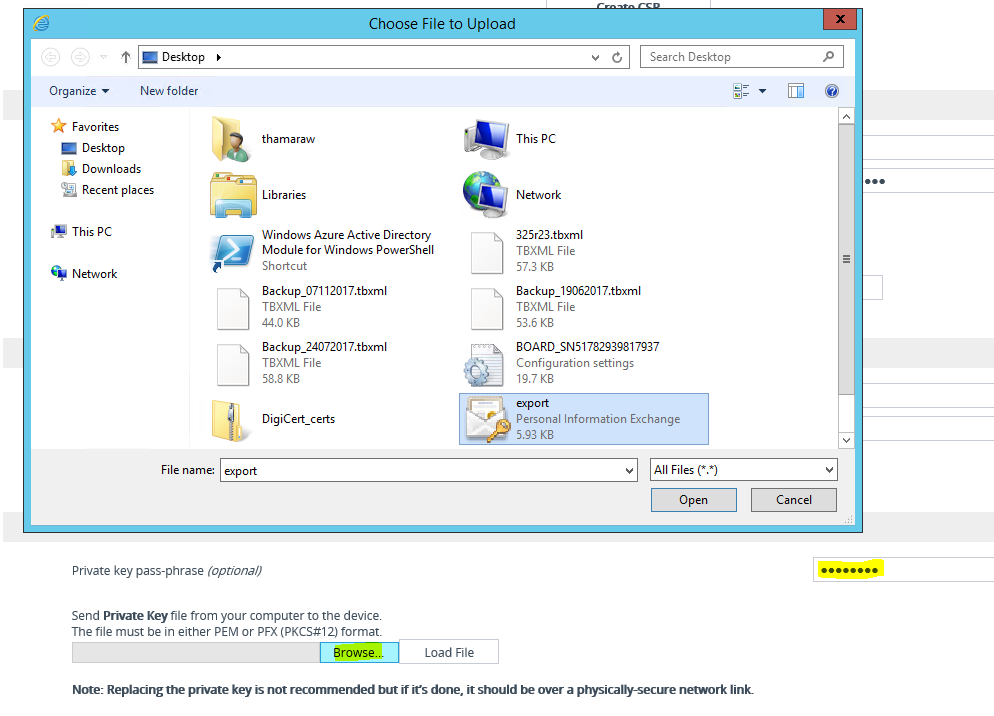
Before uploading the certificate, check the “Private Key Size” is configured as 2048 and not 1024. If it’s set to 1024, then change that to 2048 from the drop-down and click on “Generate Private-Key”. This process might take couple of seconds to complete. It’ll show as “New Private Key Configured” on the same window, upon successful configuration.

Capture4

Capture5

Now, we can upload the certificate. Notice the “Upload Certificate Files from Your Computer” section. Specify the Private Key pass-Phrase in the specified box. Click on “Browse” and load the .pfx file.

Capture1

Once the certificate have been successfully uploaded, navigate back to “TLS Context” and click on “Certificate Information”. Confirm that the recently uploaded public certificate shows up with the “Status : OK”.

Capture6

Go back and click on “Trusted Root Certificates”  and confirm that the Root CA and subordinate CAs for public certificate appears there.If not, just import the files in.

Capture31

Configure Core Components

First thing to do is, to configure the Time and Date in the SBC. Navigate to Setup> Administration>TIME & DATE, configure the Primary NTP server and UTC Offset values. Usually, the NTP server is the Domain Controller. Capture

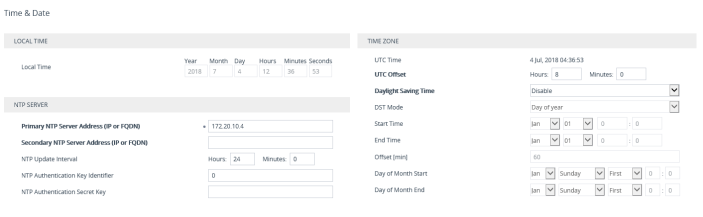
Next is to configure the SRD. There should be a default SRD configured. I’m going to use that one. Navigate to Setup> Signalling & Media > Core Entities> SRDs, configure the default SRD with highlighted values as shown below;Capture1

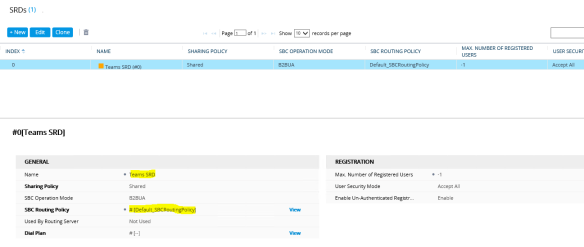
After the SRD, let’s configure a SIP Interface to be used with Teams. Navigate to Setup> Signalling & Media> SIP Interfaces, configure an Interface for Teams as mentioned below;

Capture10

Moving on to configure the Media Realm, navigate to Setup> Signalling & Media >Core Entities> Media Realms. Change the “Default Realm” and create a new Realm as “Teams” as shown below;

Capture1

Now to configure Proxy Sets, navigate to Setup> Signaling and Media> Proxy Sets, configure a Proxy set to be used with Teams as shown below;

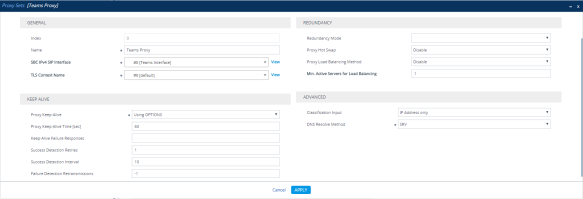
Another bit to do here. Click on “Proxy Addresses 0 items” link in the bottom of the same window. Configure a Proxy address to connect to Teams as sown below;

Capture12

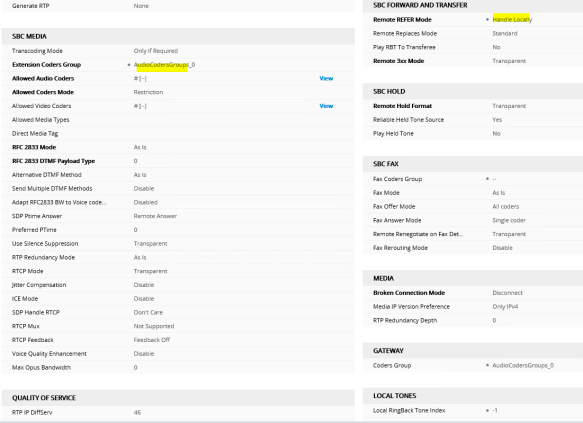
Now, i need to create an IP profile to be associated with the Teams IP Group. Navigate to Setup> Signaling & Media> Coders & Profiles> IP Profiles, Create a new profile with the configuration as shown below;

Capture27

Capture28

Moving on to configure the Audio Coders. The required coders for the integration with Teams are

  • SILK Wide Band
  • SILK Narrow Band
  • G.711 A
  • G.711 U

By default, G.711 A and G.711 U is included within the SBC. In order to enable SILK codecs, the Transcoding license is required.

Note : SILK Codecs are recommended as the preferred codecs to be used for the integration. Missing those, G.711 A law will still work. But will not be as optimized as  using SILK Codecs. To configure Coders, navigate to Setup> Signaling and Media> Coders & Profiles> Coders Groups. Edit the existing Group _0 and add Codecs in above mentioned order

(my Lab setup does not have Transcoding licenses and i’ll be using only G.711 A and U laws. In production environment, make sure to procure the required license).

Capture14

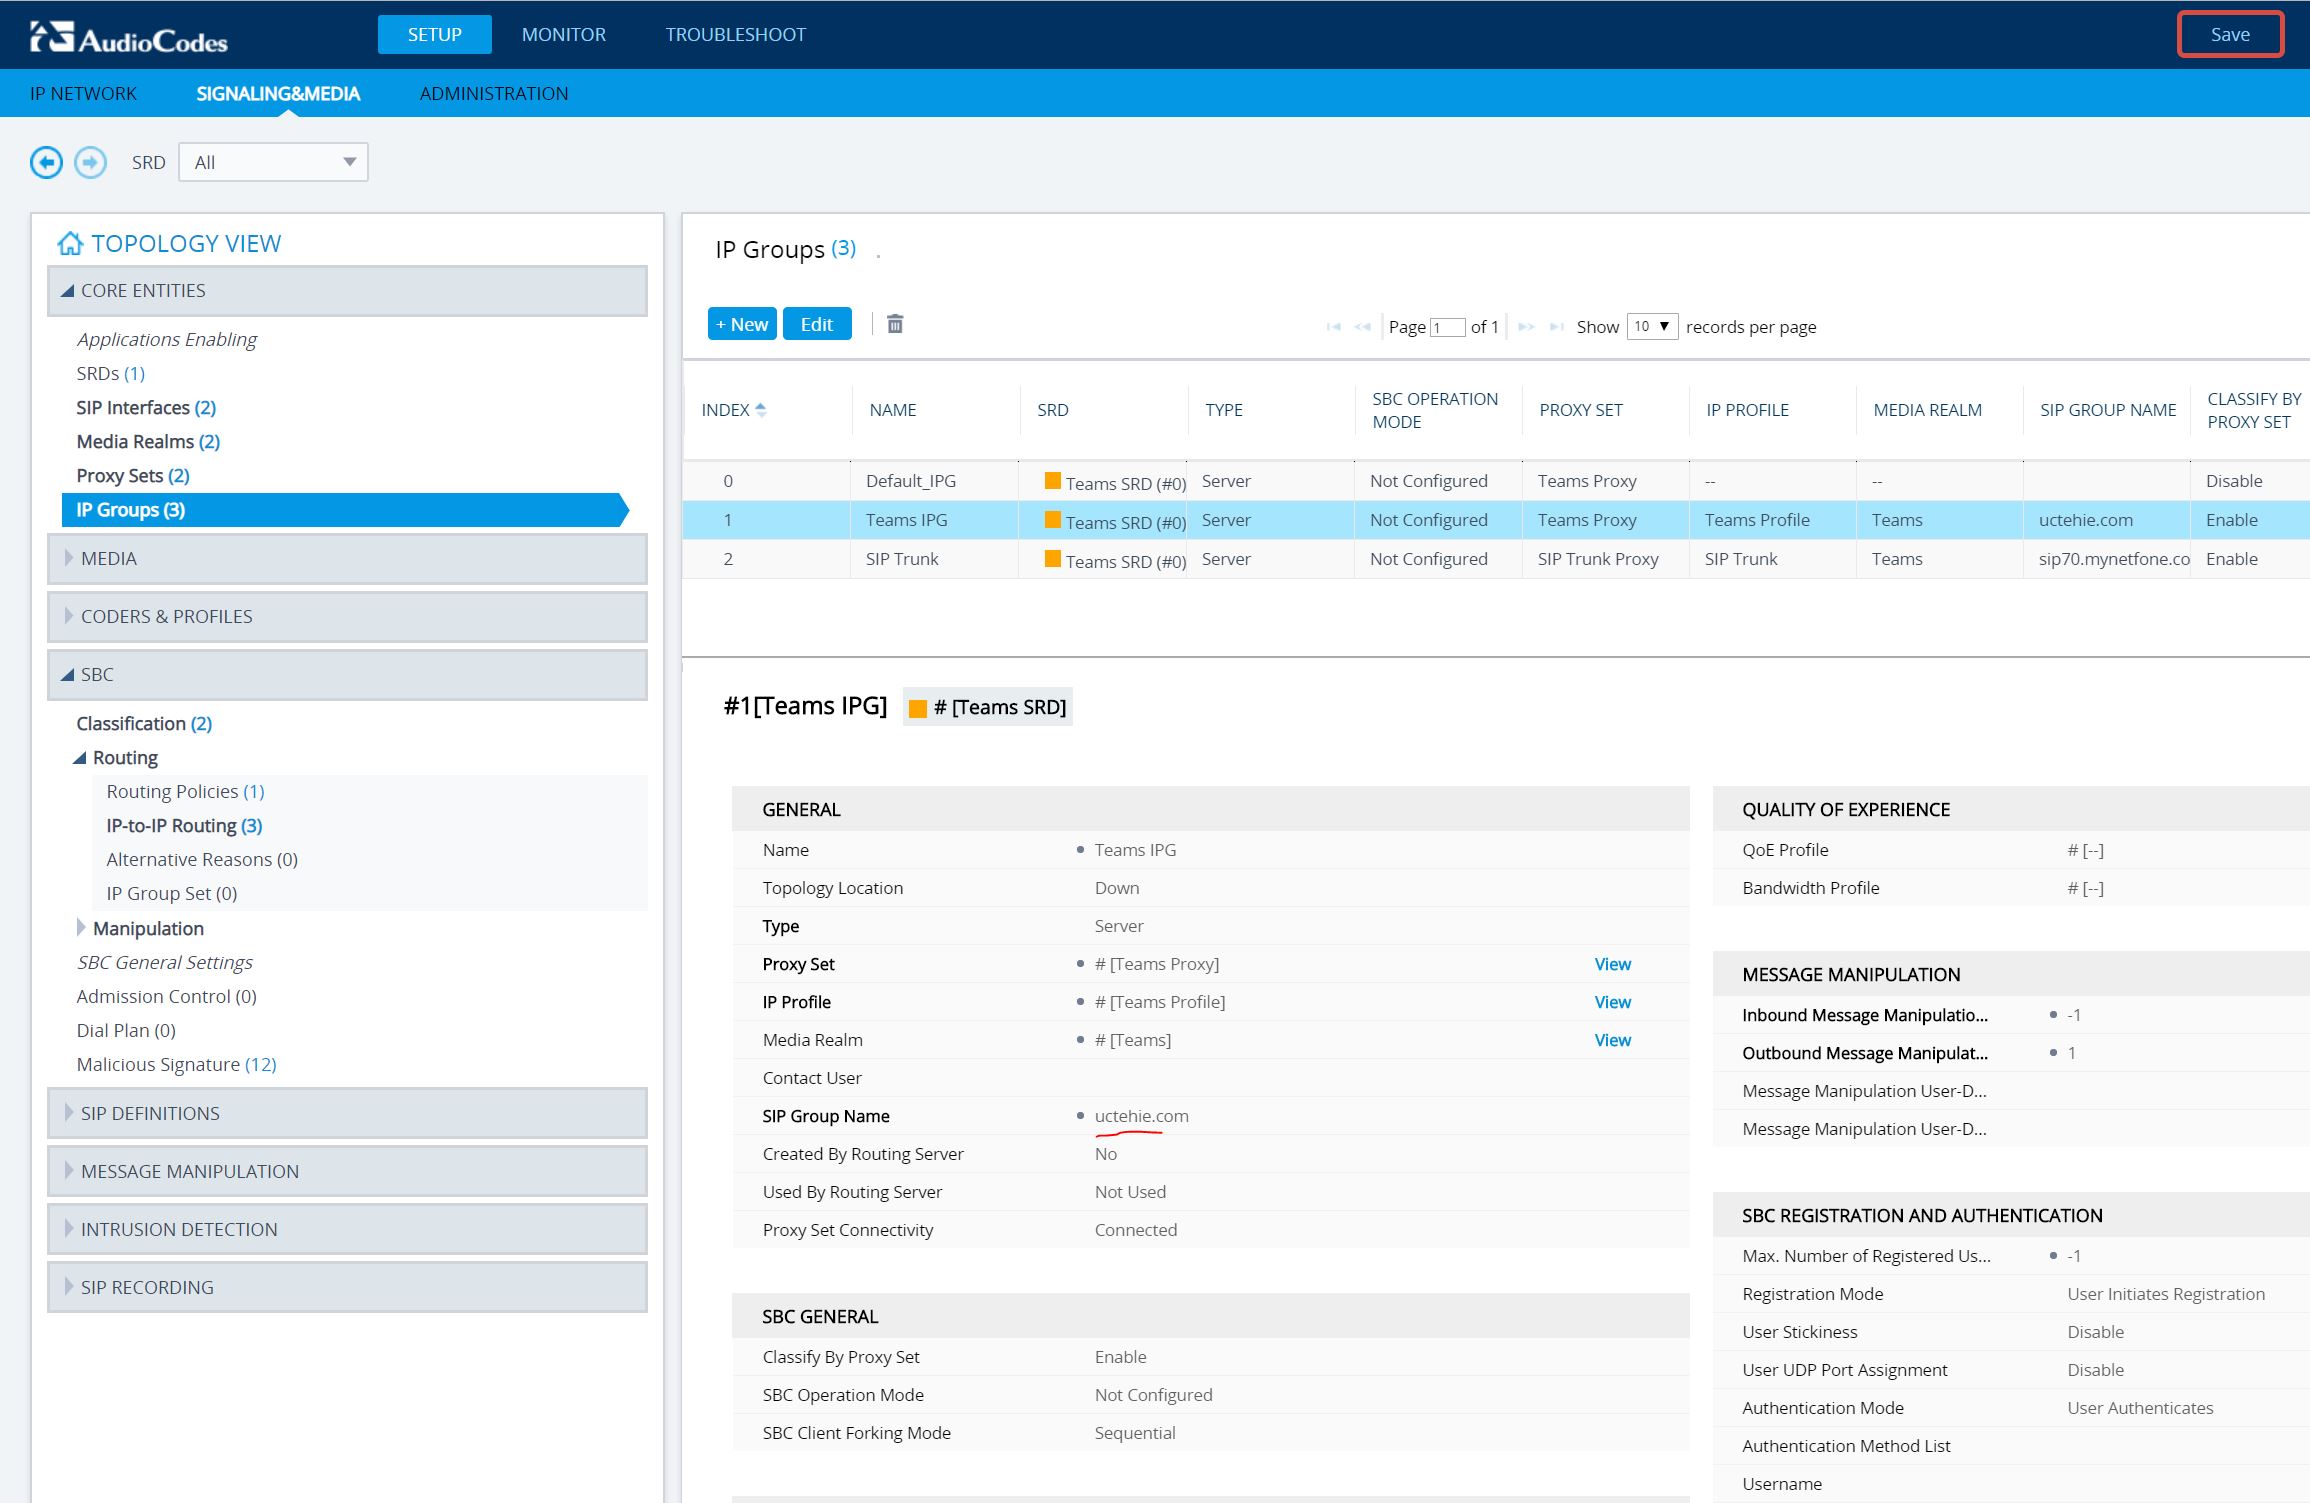
Next step is to configure an IP Group to be used for Teams. Navigate to Setup> Signaling & Media> Core Entities> IP Groups, configure the IP Group as shown below;

Capture16

Media and SBC

Now we are done with the core configuration. Moving in to configure Media components. Starting by enabling Media Security and SRTP. Navigate to Setup> Signalling & Media>  Media> Media Security. Configure the parameters as shown below;

Capture29.PNG

Also,

  • in Setup> Signalling & Media>  Media> RTP/RTCP Settings, Configure “Comfort Noise Generation Negotiation” to be Enabled.
  • in Setup> Signalling & Media>  Media> Voice Settings, Configure “Silence Suppression” to be Enabled.

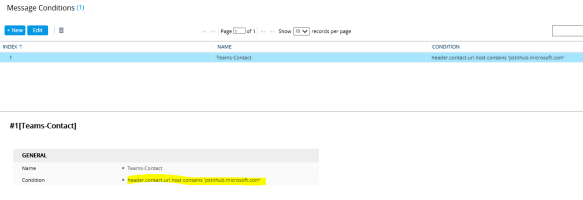
We need a Message Condition Rule, that need to be assign with the Classification. TO configure the Message Condition, navigate to Setup> Signaling & Media>  SBC> Message Manipulation> Message Conditions, configure a condition as shown below;

Capture1

Next to do is the SBC component configuration. Navigate to Setup> Signaling & Media>  SBC> Classification, configure inbound connections from Teams to be classified as allowed and trusted source. Configure the Classification as shown below;

Capture22

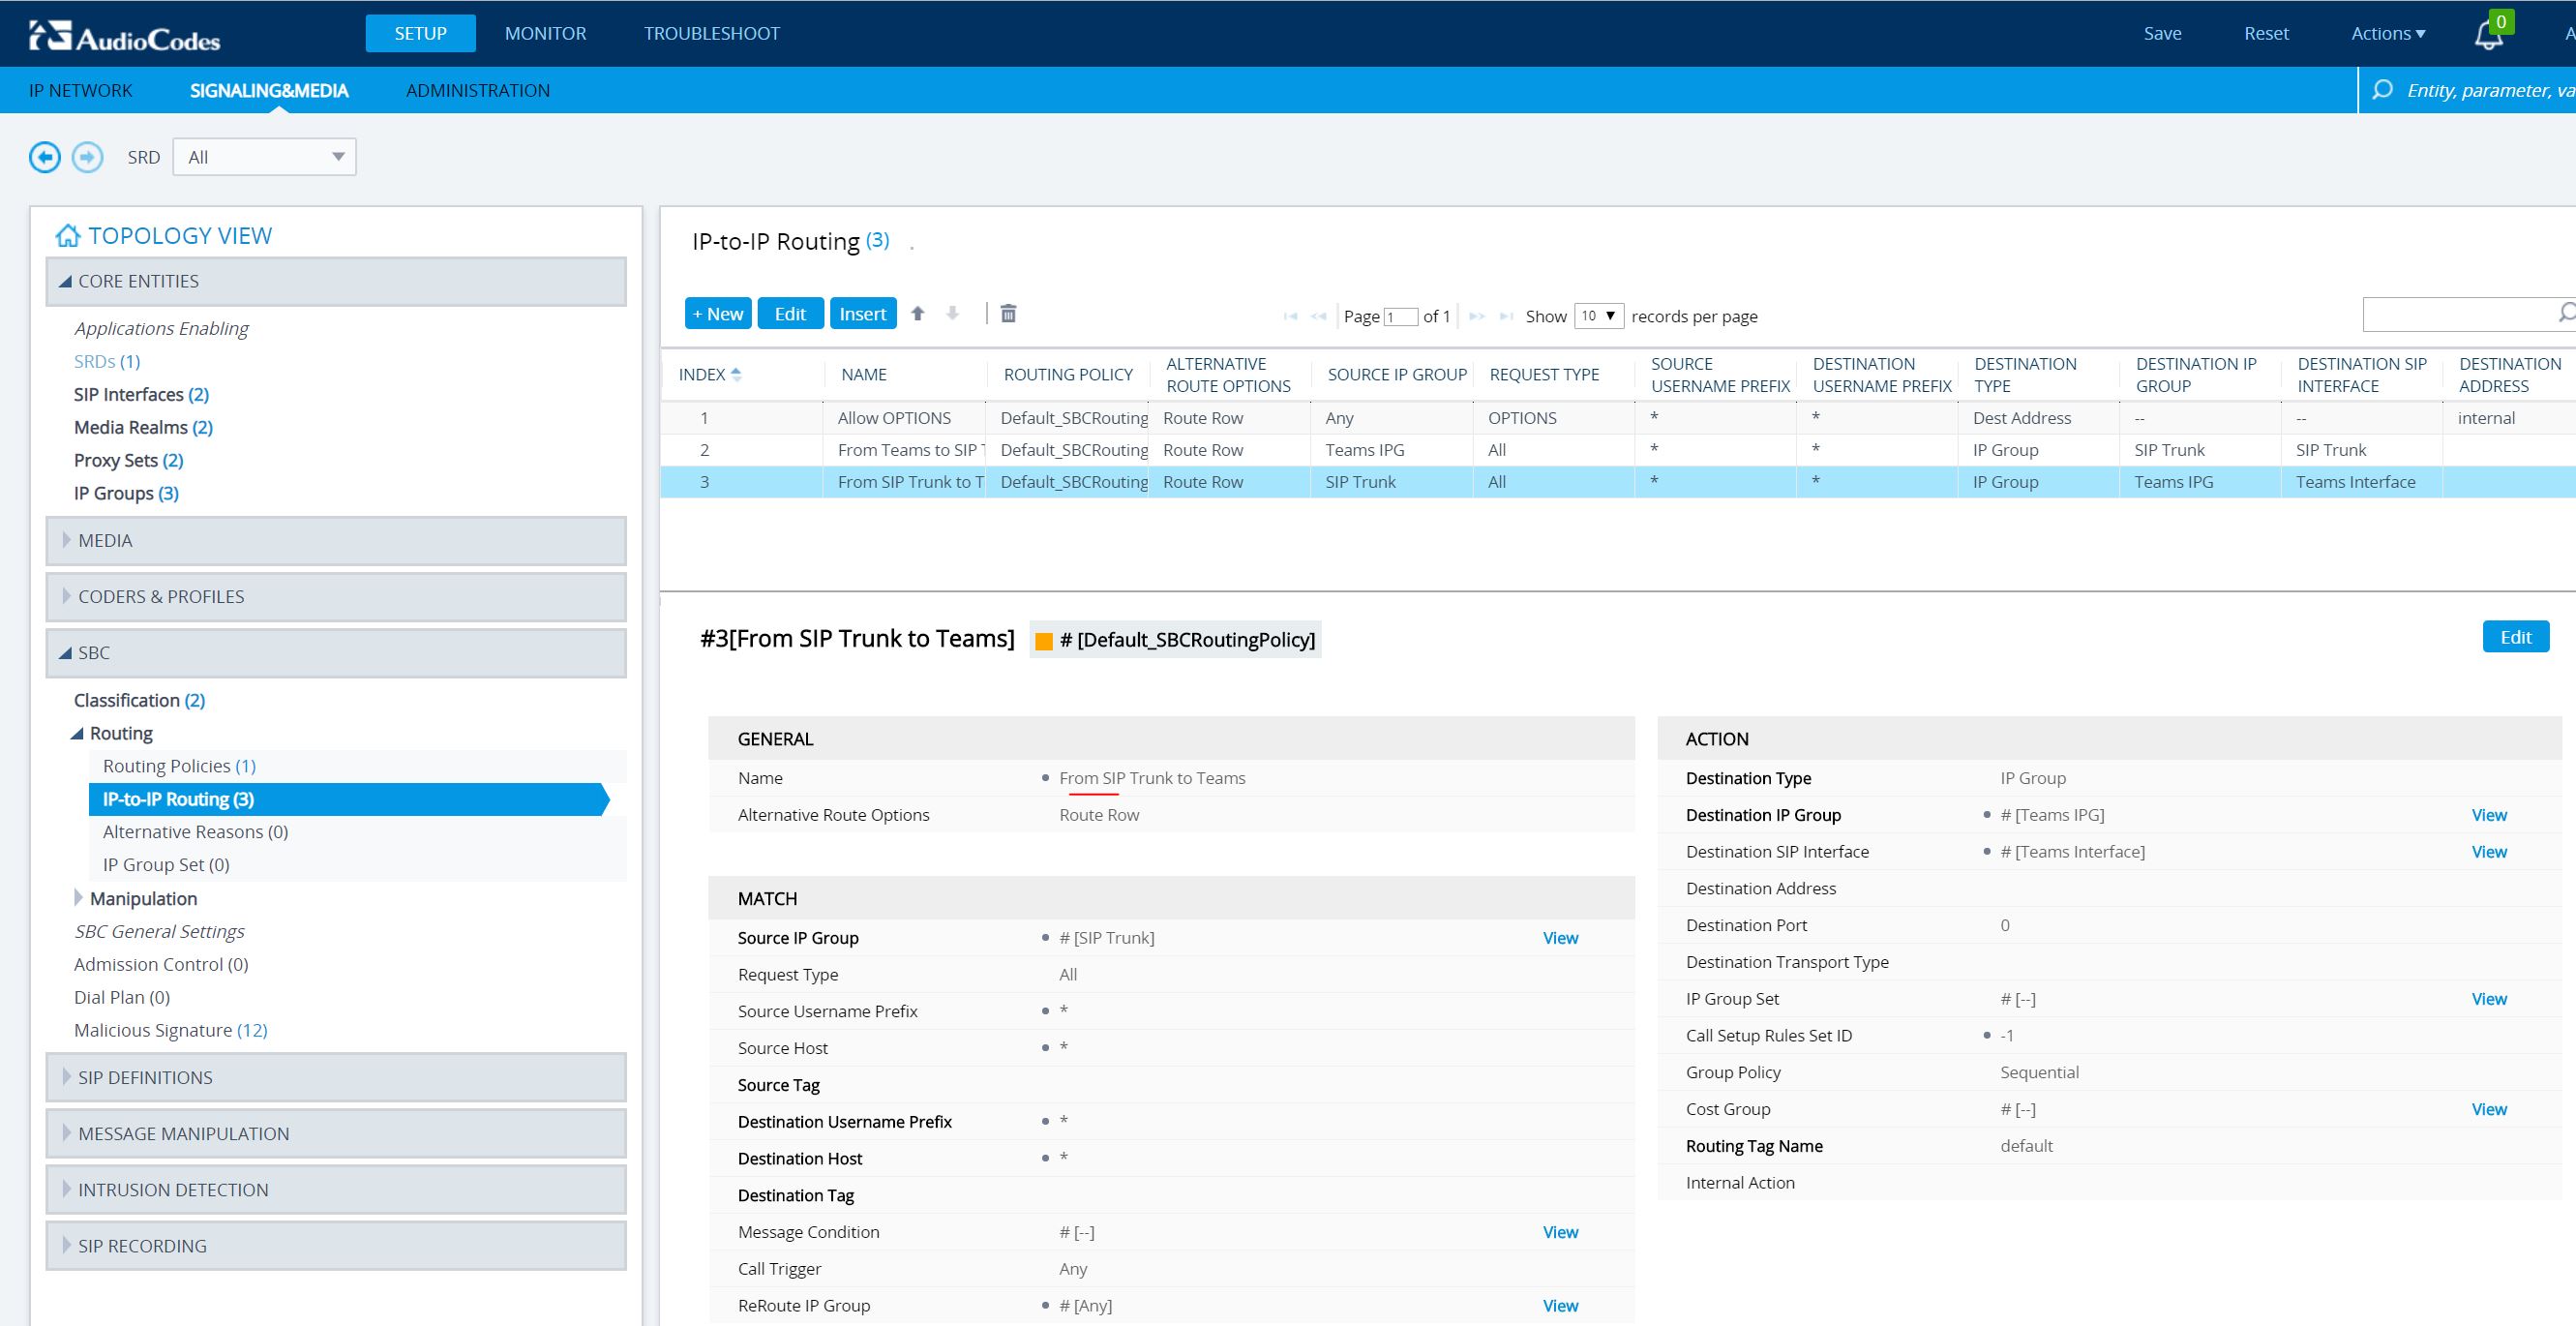
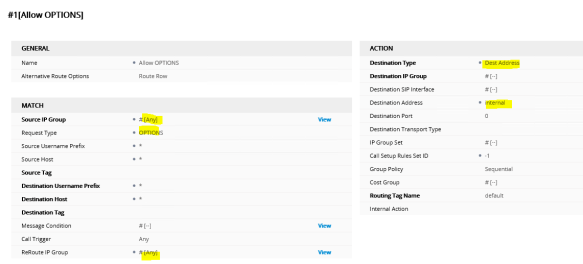
Next is to configure a Route to allow OPTIONS requests to flow between Teams Proxy and SBC. Navigate to Setup> Signaling & Media> SBC> IP-to-IP Routing and configure a route as shown below;

Capture23

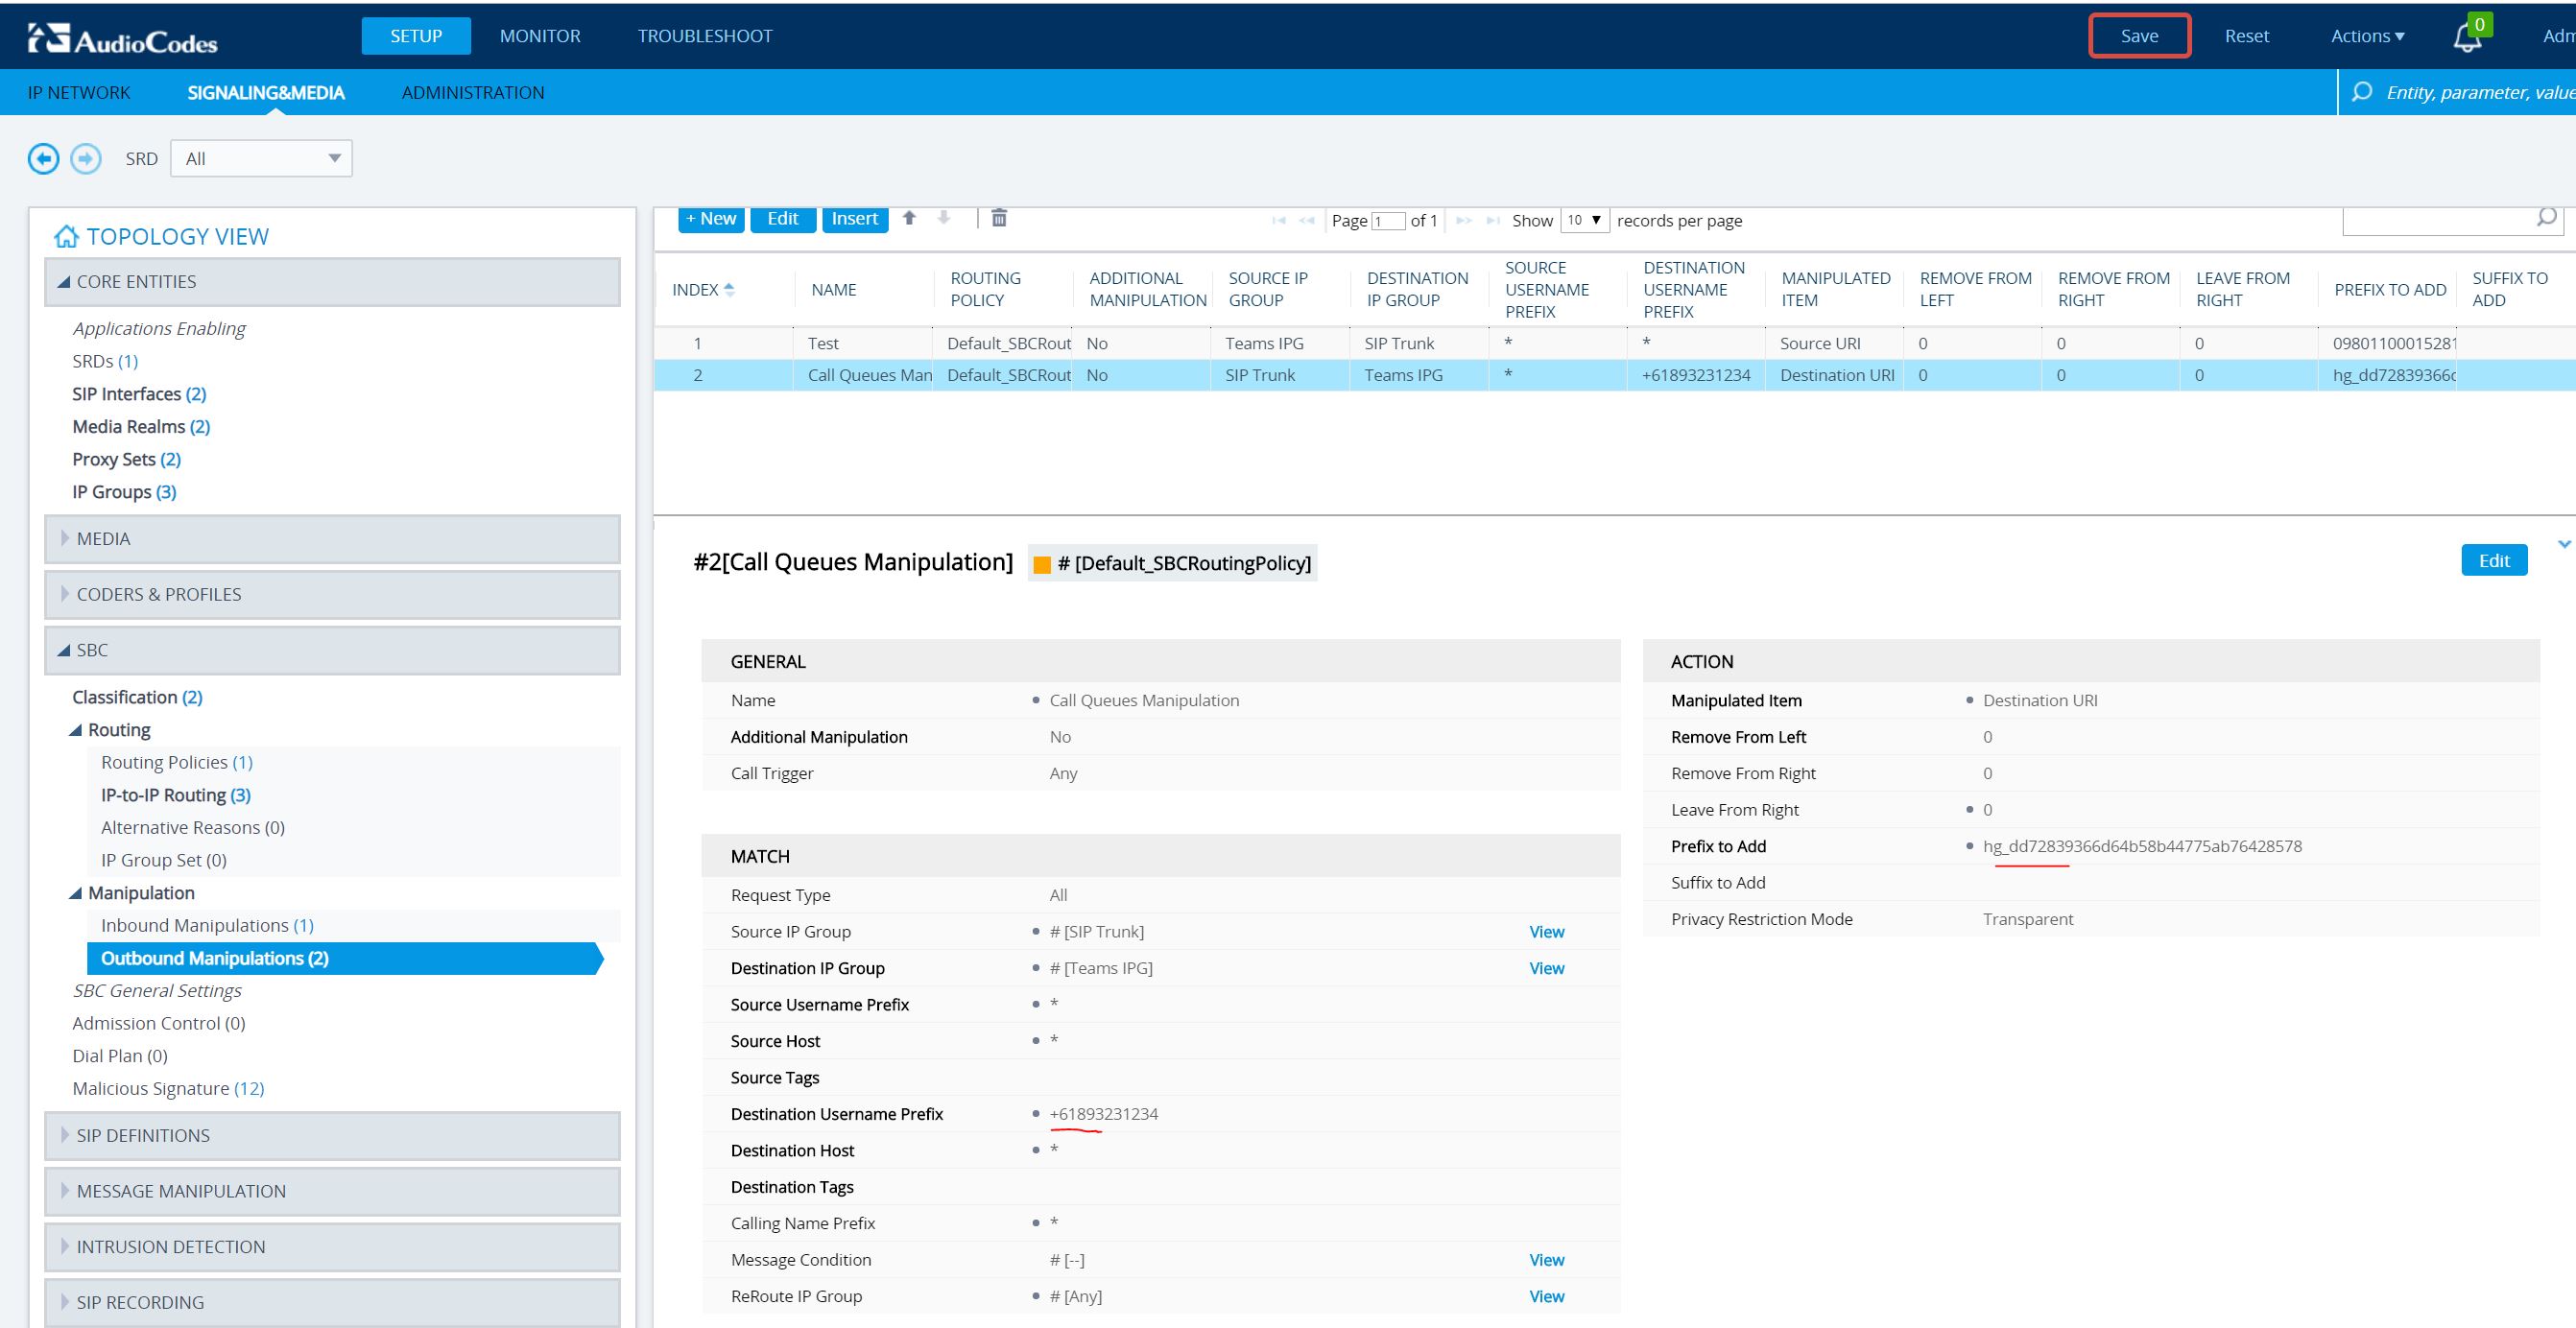
Now, we need to do a SIP Header manipulation. The reason behind this is, the standard OPTIONS request, the FROM header consist of the IP address of the SBC it self. Since Teams only allow TLS connections, which is based on the device host name, the IP address need to be replaced with the host name. To do this, configure a Header Manipulation rule as shown below;

Capture24

Capture25

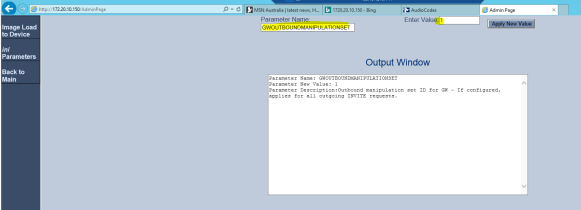
Now, we need to enable this Manipulation set and assign to the Teams IP Group. To enable the Manipulation set, browse to http://<SBC IP Address/AdminPage and configure the value as mentioned below;

Capture18

Go back to the IP Group configuration and confirm that the “Outbound Message Manipulation Set” is configured with the proper value;

Capture26

Finally, we are done with the configuration. If all works well, you should see a green check mark on “Teams” IP Group in Topology View;

Capture20.PNG

Also, if you go to Monitor> Monitor> VOIP Status> Proxy Sets Status, all Proxies should come up as “Online” and the active one would be marked as (*);

Capture32Now, i’m good to make a test call from my Teams client. I’ll be calling my test mobile, which i have a route configured (in my previous blog post) to allow Mobile calls to this SBC;

Capture19

And we have an inbound call from Teams, coming in to the SBC. Notice the IP address of the inbound SIP message and the User Agent header in the message. The call comes from Teams proxy server. We can confirm that we have a functional integration between Microsoft Teams and Mediant VE SBC. Please post any comments that you have in comment section below. Thanks.

LDAP Based Authentication for AudioCodes Gateways\SBCs


AudioCodes hardware are now becoming preferred solution for most Lync\Skype for Business deployments. For those who are not familiar with AudioCodes hardware, the standard login account for all devices comes as “Admin” with the password as the same. Of course this will get changed to a more complex password later on and it allows creation of local user accounts with different access levels, most organizations prefers to allow Active Directory (AD) to control access in to the device.

AD will have security groups with users, which will have different levels of permission in to the gateways. This article explains how to configure the AudioCodes gateways to authenticate using LDAP. The firmware version of this configuration is version 7.1.x

The 1st thing you need to do is, to enable LDAP authentication on the device. The configuration parameter is located at “Administration” tab

Restart the gateway after enabling this configuration.

Once the Gateway is up, go to “IP Network” and “LDAP Settings”. Enable the “LDAP Service”.

Again, restart the Gateway to apply the configuration. Do not try to pile up the parameters that needs restart to kick in. Restart every time you make a change that require a restart. Once the Gateway is online again, navigate to the “LDAP Settings” again and configure the “LDAP Authentication Filter” as (sAMAccountName=$).

Under “IP Network”, navigate to “LDAP Server Groups” and create a Management Server Group.

Now, create a LDAP Server to authenticate with. Create an LDAP server under “LDAP Servers”. Impotent thing to mention is the LDAP Bind DN add the LDAP Password entries. LDAP Bind DN must be $@domain.com and the Password must be $. Once configured, you will see that the “Connection Status” as “LDAP CONNECTION BROKEN” That status is normal and don’t worry about it. It doesn’t mean that that the Gateway cannot talk to the LDAP server.

Configure the “LDAP Server Search Base DN” this is the OU where the security account that will have access to the Gateway lives. 

Configure a “Management LDAP Group”. This is where you assign the level of permission to the AD security group.

That’s about it with the configuration. Now, the users that are in the “AudioCodes_Access” group should be able to log in using their AD credentials, in to the Gateway.